Welcome to Mobiography’s updated Snapseed app tutorial guide for 2019. In this guide you’re going to learn about the Snapseed app, and how to use it to edit and enhance your smartphone photos. I’m going to show you the step-by-step process that I follow for basic photo editing with my iPhone. I’ll show you how to convert your photos to black and white, how to edit portraits, how to remove unwanted objects using the healing tool and how to correct any mistakes in your edits.

Please be aware that this tutorial guide is a bit of a beast (and to be honest only scratches the surface of what can be achieved using Snapseed) so if you want to skip certain sections and jump straight to the parts that interest you, simply click on the table of content links below.
Table of Content
- What is Snapseed?
- Getting started with Snapseed
- How to use Snapseed – a basic photo editing process
- How to convert a photo to black and white in Snapseed
- How to edit a portrait or selfie in Snapseed
- How to remove an object using the healing tool in Snapseed
- How to edit your Snapseed edits using the stacks menu
- Final thoughts
What is Snapseed?
Snapseed is one of the most popular and versatile photo editing apps in the iTunes and Google Play app stores and is certainly one of my favourites. Originally developed by Nik Software, Snapseed was acquired by Google back in 2012. Since then the app has been redesigned and updated.
The Snapseed app is free to download and available for both iOS and android devices. You can download the Snapseed app using the links below.
![]()
![]()
Unfortunately, Snapseed isn’t available for use on desktop computers but it is fully compatible with smartphones and tablets.
Getting Started With Snapseed
On opening Snapseed you will first be faced with a grey screen prompting you to select the image you want to work with. When it comes to selecting the photo to use, you have several options. You can either choose an image from the camera roll, take a photo with the camera, open the latest image or paste in a copied image.

With the desired photo selected you then notice that the entire screen is devoted to your chosen image with a minimal navigation interface surrounding it. Walking through the navigation layout you will find the following;
In the top left corner is ‘OPEN’, tapping this displays a pop up menu which enables you to select a new photograph to work with.
In the top right corner there are three symbols, going left to right you have, the Stacks menu which allows you to undo, redo, or revert back to a previous stage of editing. Stacks is where you can also access the different layers for each of the edits you have made. From here you can adjust the settings of each layer or filter or delete without having to start your edit again from scratch.

Next, there’s the information section which gives more details about the image size, date taken, device used and geo location. Finally, the three dot icon gives access to the app settings, help and feedback links as well as some helpful tutorial guides.
At the bottom of the screen there are three tabs: LOOKS, TOOLS and EXPORT.
Looks – Looks provides a selection of preset combinations which you can quickly apply to your photos to give them an instant lift. Sliding to the right allows you to scroll through these options and access any presets that you have created yourself.

Tools – The tools tab is the section where you are going to spend most of your time. It houses all the tools and filter options. More on this in a second.

Export – Finally, the export tab opens up a pop up window giving you access to several ways to save and export your Snapseed editing photos. The ‘Save’ option will overwrite the current image in your camera roll with your updated edit, while ‘Save a copy’ will save your image and its edits as a brand new photo in the camera roll. The export option will create a copy with your edits permanently applied.

TIP: Once you have finished editing a photo I recommend saving the photo and then exporting your photo. The reason being is that I have found Snapseed has a tendency to lose your edits as time goes by. By using the export option it means your final image is set in stone and always accessible.
How to Use Snapseed – a Basic Photo Editing Process
So now you have an overview of the tools and filters of Snapseed, let’s start using a few, putting them together and begin editing a photograph.
Step 1: Select and Open a Photo
The first step is to select and open a photo to start working with. To do this from the initial splash screen tap ‘Open’, then select to open a photo from your device, from your camera or from the last image used.
For this I select a photo from my Camera Roll

Step 2: How to Straighten a Photo in Snapseed
With the image open which we’re going to work with, the first thing to do is open the tools menu. Generally, I prefer to open the photo in the ‘Rotate’ tool first to check and adjust any inconsistencies in the horizontal or vertical alignments.

To do this I tap the ‘Rotate’ tool. By default, Snapseed will often automatically adjust the rotation if it detects and strong horizontal or vertical lines and will straighten the photo to these. In some cases such as with photos will skewed vertical lines, this adjustment can be wrong. In which case simply slide your finger left and right to slightly straighten the horizon against the grid overlay. Once happy that the horizon is straight, I tap the confirm tick icon to apply the change.
Step 3: How to Crop a Photo in Snapseed
Next, I’m going to crop the image so that the composition of the photo is as I want it. To do this I again, tap the Tools tab, then select the Crop tool.
At the bottom of the screen you will see several options. The first stage on the cropping process is to select a ratio format by tapping the icon second from the right. This opens a pop up window with various ratios. Swipe from left to right until you see your preferred format. I generally go for a square 1:1 ratio format but it depends on the composition of the photo I am working with.
With the format selected I then move the crop area around using my finger until I have my desired composition framed. For this image I position the horizon on the lower rule of thirds grid line and position the tree on the lower right intersecting line.

You can drag the corners in or out, or change the orientation of the crop frame by 90 degrees by tapping the rotate icon (the icon to the left of the centre). Be aware though, that reducing the size of the crop will reduce the size of the final image.
To confirm the crop tap the tick icon and your crop is saved.
Step 4: How to Enhance Color and Exposure in Snapseed
The next step in my basic editing process is to fine tune the brightness, contrast, saturation levels of the image. The image we are working with at the moment is nicely exposed so there isn’t much to do here but sometimes you might want to make more drastic adjustments depending on how over/under exposed your image is or the effect you are aiming for.

Firstly, open the photo in the Tune Image tool, then tap the auto correct option (the icon to the right of the centre at the bottom of the screen) to see how the image looks. This tends to even out the Histogram levels (the graph image in the lower left). I find the auto correct feature offers a good starting point from which to work from.
If I decide to make any further edits I’ll make more manual adjustments. By swiping my finger up and down, Snapseed displays a selection of options which include; Brightness, Contrast, Ambiance, Saturation, Shadows, Highlights and Warmth settings. Swiping the screen left to right will adjust the level of a chosen setting.
For this image I don’t need to make any further adjustments so I save this edit.
Step 5: How to Selectively Enhance Color and Exposure Using Selective Adjustments
Next, I want to add a bit more contrast to the sky area in order to get a bit more texture into it, but not in the foreground area of the photo. To do this without affecting the whole image I use the ‘Selective’ tool.

With the Selective tool open, tap the screen where you want to place a marker, then using two fingers pinch in or out to increase or decrease the area to be affected. This will be shown in red.
With your adjustment area set swipe up and down to select from the Brightness, Contrast or Saturation options, then swipe left or right to increase or decrease the level of that option.
For my image I tap on the sky, then select the work area to include the whole of the sky and increase the contrast level to +50.

Happy with the edit I tap the tick to confirm my edit.
Step 6: How to Add Clarity to Photos in Snapseed
Next I’d like to add a bit more detail and clarity to the photo. There are a couple of ways to do this. The first is by using the Details tool. The second is by using the Tonal Contrast tool. Let’s take a look at both options.
Using the Details Tool
The Details tool allows you to give more definition and clarity to an image by adjusting the Structure and Sharpening of the image.
The Structure setting will increase the amount of detail in the image. Structure will bring out the texture of objects throughout the photo, without affecting the edges of the objects. Sharpening on the other hand increases the amount of sharpness in the details of the image. Increasing the settings will give more definition to the image, while decreasing the settings will soften the look of the image.
For my photo I would increase the structure by +25 to introduce a little clarity in the grass and clouds but not too much.

Using the Tonal Contrast Tool
The next way to add clarity to a photo and the method I prefer is to use the Tonal Contrast tool.
The Tonal Contrast tool allows you to select the Low, Mid and High Tones and increase the level of definition in these areas in order to sharpen the detail contained within them. The tool also allows you to protect shadow and highlight areas which will gives you a further degree of control when adding definition to select areas of an image.
Very often you can just leave the Tonal Contrast settings at their defaults but for this photo I decide to increase the Low Tones to +100 and Mid Tones by +50. Tapping the icon in the top right corner allows you to compare the before and after states.
If you need to zoom in then pick out to zoom in and navigate your way around the image using the blur box that appears.

Once I’m happy with the results I tap save.
Step 7: How to Add Mood to a Photo in Snapseed
There are several tools in Snapseed that will allow you to add mood to a photo by applying a colour filter to it. Let’s look at a couple of the most popular tools.
Using the Grainy Film Tool
Grainy Film is a popular tool in Snapseed. It offers 18 different filters that gives a photo a more analogue film type look. The results are subtle and similar to the filters you get in the VSCO app.
After selecting a filter preset, you can adjust the amount of grain that is applied to the image as well as the strength of the filter. As with the other filters you are able to pinch to zoom in closer to the photograph for more detail.

Using the Vintage Tool
Another way to add mood to a photograph, and one of my personal favourites, is the vintage filter. I especially love it for landscape photography, its one of my go to filters in the majority of editing that I do.
Once you have opened the ‘Vintage’ filter select one of 12 filter presets from the pop up options that appear after tapping the small swatch icon (to the right of the centre at the bottom). In this instance I go with option 10.

To the left of the centre at the bottom is an option to add some vignette blur to the image. I opt to leave this switched off.
Next I swipe up and down to select the Brightness option and increase this setting to about +20. You can also adjust the colour saturation, the style strength or the vignette strength. I opt to leave these at their defaults except for the vignette strength which I reduce to +15. I prefer to add some extra vignette in the next step.

Step 8: How to Add Mood Using the Vignette Tool
I am a big fan of vignettes and nearly always add the effect to my photos. I love the way this effect directs the viewers attention to the subject in the centre of the photograph.
The reason I reduced the vignette effect in the ‘Vintage’ filter is because I prefer the increased level of control that you have using the ‘Vingette’ tool. Let me show you what I mean.
After opening the Vignette tool there are basically two settings, the inner and outer brightness. For this image I feel that the foreground is probably dark enough but the sky would benefit from a little darkening to the edges.
Using my finger, I move the centre point of the vignette so that it is located at the bottom of the image. I then spread the diameter of the vignette area to cover the top edge of the photo.

Next, I darken the outer brightness by -85 and leave the inner brightness at 0 and reposition to the centre point of the vignette area so that the main part of the vignette is applied to the sky area. Again, tapping the tick saves the edit.
Step 9: Save the Image
At this point I’m pretty happy with the end result so I save the image. To do this, tap the ‘Export’ tab at the bottom right of the screen, then ‘Save’ from the popup menu. This will save your edits to the original image in a none destructive way. You can also save a copy which will save a new version of the photo with affecting the original photo.

At this point it is worth pointing out that although Snapseed is the same on iPhone and Android devices, the android version has one minor difference when it comes to saving options. On android your save options are; Save (which creates a copy of the photo), Export (which creates a copy of your photo where the sizing, file format – JPG or PNG and image quality compression are changed to those which you set in the Snapseed settings). The third and final save option is Export as which creates a copy to be added into a selected folder of your choice.
TIP: Once you have completely finished editing your photo, I would recommend saving a further copy of your image by using the Export option. This creates a copy of your photo with your edits permanently applied. The reason for this is that I often find if I go back and open old photos, all Snapseed edits have been completely lost – which is very annoying. My saving a version with your edits permanently saved you are able to preserve the final look.
And here is the finished image along with the original version.


How to Convert a Photo to Black and White Using Snapseed
I like the colour photo that I’ve been editing as it is, but let’s see how it looks in black and white. There are a couple of ways to convert a colour photo into black and white using Snapseed. Let’s take a look at how to do this.
Method #1: Using the Tune Image Tool
The first method of converting a photo into black and white in Snapseed is to use the Tune Image tool. First, open the photo in Tune Image, then swipe up/down to select the Saturation option. Now slide your finger to reduce the level of saturation to -100. This will remove all color from the photo and will leave you with a black and white photo.

Often though, you will find the photo looks a bit flat and grey so we now need to make some more adjustments in order to bring the photo to life.
Now select the Shadows option in the Tune Image tool and reduce the shadows setting down to -50. You can also have a play with the warmth settings to further fine-tune the dark areas.
The resulting image now has more depth and richer blacks.

Next I save this edit.
Method #2: Using the Black & White Tool
The second method uses the ‘Black & White’ tool. I begin by opening the image in the ‘Black and White’ tool. Here you can choose from six presets (accessed by the icon to the right of the centre) or fine-tune the image by swiping the screen up and down to select the brightness, contrast or grain levels, then swiping left to right to adjust the setting of that filter.

You can also apply a colour filter to the photograph which emulates the effect you would get if using a colour filter with traditional black and white film.
For this example I select the Dark preset and add the orange colour filter to further darken the black tones slightly.

Next I save this edit.

How to Edit a Portrait or Selfie in Snapseed
When it comes to editing portrait or selfie style photos in Snapseed, the key thing to bear in mind is that less is more. When editing a portrait the main aim is to enhance the image and not to over do your edits. Let me demonstrate.
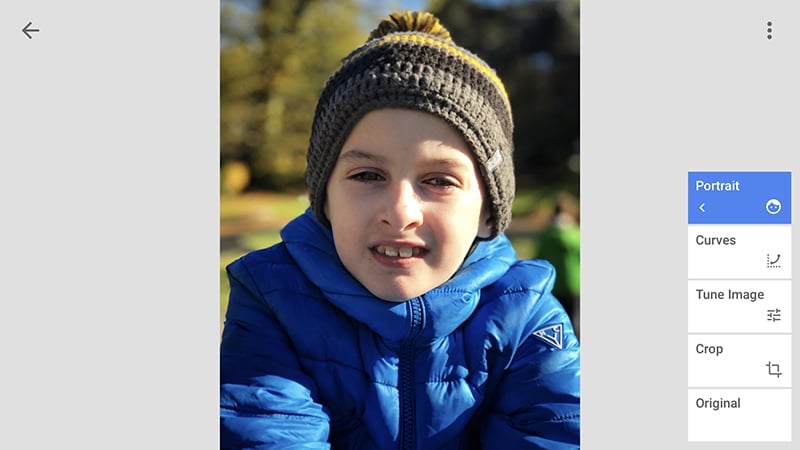
Here is a portrait I took of my son playing on the park.

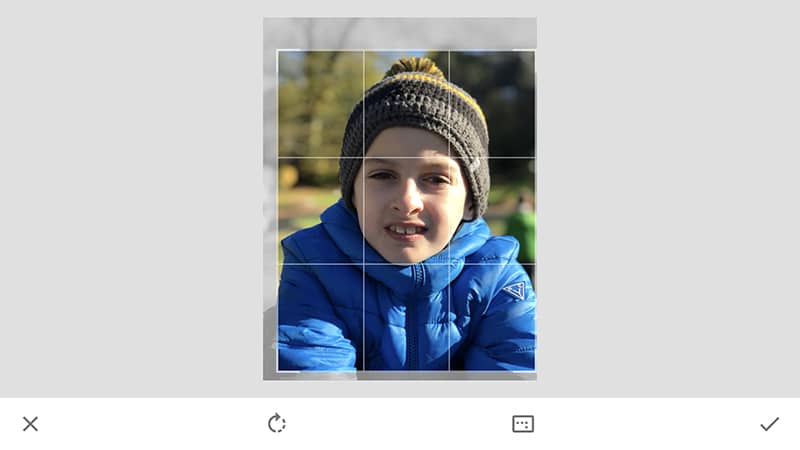
Step 1: Crop the Photo
The first step in my editing process is to crop the image. For this photo I choose a 5:4 crop as it suits the origination of the photo. I also position the crop so that the face is central in the image.
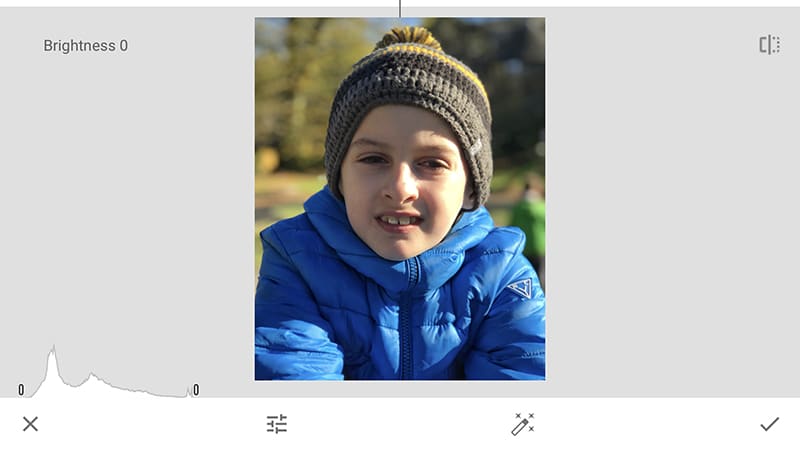
Step 2: Adjust the Photo in Tune Image
The next step is to adjust the photo in the Tune Image tool. I begin by tapping the auto-correct button, then I review the adjustments. This has increased the amount of detail in the shadows area. I decide to add a little extra Ambience in order to brighten the photo and make the colours more vibrant. Happy with the changes I hit the tick.
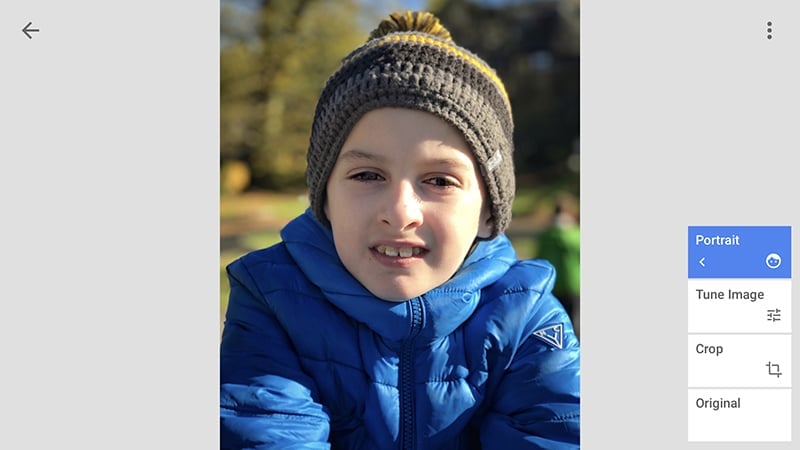
Step 3: Enhance the Photo in the Portrait Tool
Next, I open the Portrait tool which is perfect if you want to enhance and smooth out the quality of the facial features.
Tapping on the swatch to the bottom right of the centre settings icon opens a selection of 10 preset filters that highlight areas such as eye clarity, skin smoothness, lighting or a combination of the three.
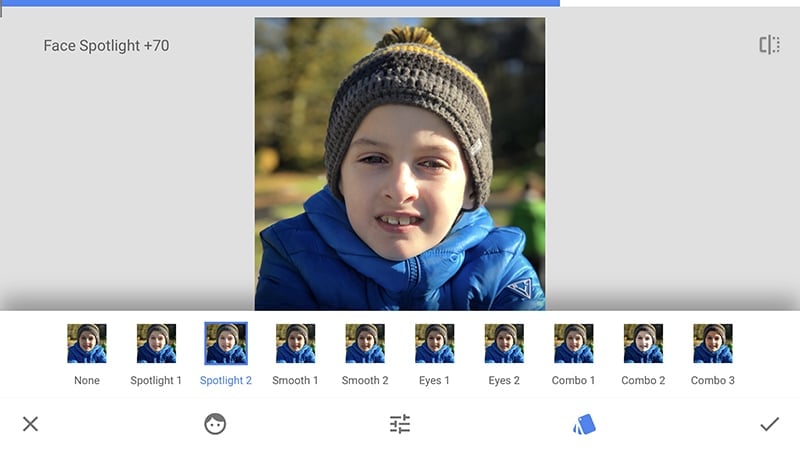
For my photo I select spotlight 2 as it adds a richness to the shadows, it makes the colours pop and brightens up the face area.
The icon to the left of centre allows you to select the skin tone of the face from pale to dark. Each option applies a different level of clarity and lighting.
For more manual control over the settings, tap the centre icon or simply swipe up and down to display the options of Face Spotlight, Skin Smoothing and Eye Clarity. Swiping right will increase the level applied to the setting. Swiping left will reduce this.
After selecting the Spotlight 2 preset I leave the settings at their defaults and hit the tick icon to apply my changes.
Again, I’d like to highlight that pushing all the settings to the max can give a slightly over app’ed look so pay attention to this when editing.
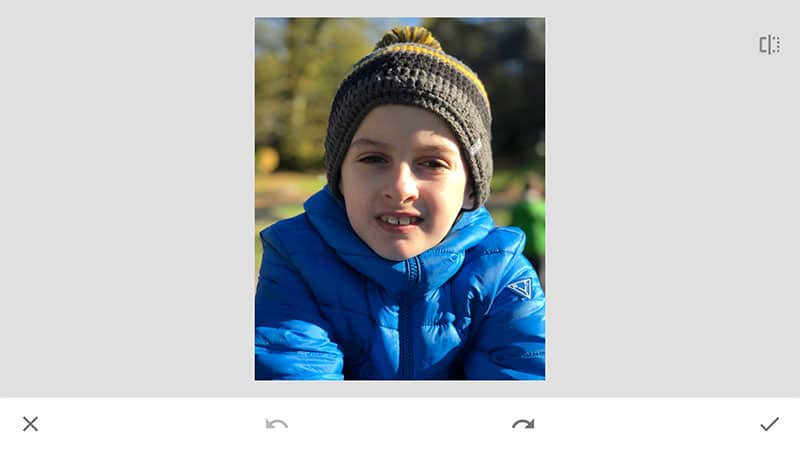
The Final Image
I could add a vignette to the portrait in order to further darken down the outer edges but I decide to the leave the editing there – less is more.
And here you have the final image along with a comparison to the original. As you can see with only a few small changes I have managed to give more depth, vibrance and clarity to the portrait.


How to Remove Objects Using the Healing Tool in Snapseed
To remove objects in Snapseed you’ll need to use the Healing tool which enables you to zoom in close and carry out detailed object removal, retouching and repairs to your photo.
To use the Healing tool, I first zoom in close to my photo using a two pinch pinch gesture so that I can be more accurate with my editing. If I don’t then the results can sometimes be random and a bit haphazard. For my photo I decide I want to remove the label on the hat.
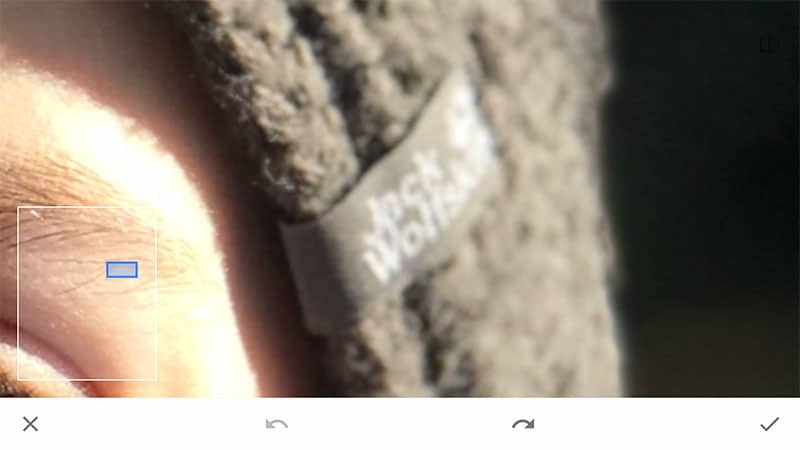
Once you’re focused in on the object to be worked on, simply start drawing with your finger and paint over the object to be removed.

As soon as you release your finger from the screen Snapseed will cleverly fill over your mask area with that of the surrounding area.

The healing tool in Snapseed can be a tricky tool to master at first. It is excellent for simple and small edits or plain areas of similar pattern and tone, however, for something more complex you may be better using an app such as TouchRetouch.
How to Edit your Snapseed Edits Using the Stacks Menu
The beauty of Snapseed is that all the edits which you make are saved in a non-destructive way and are stacked on top of each other in layers. This means that you can edit these layers at a later date. Let me show you how.
To edit your Snapseed edits, open the Stacks menu by tapping the small diamond and arrow icon in the top right corner of the app home screen. This opens a pop up window where I next select, ‘View Edits’.
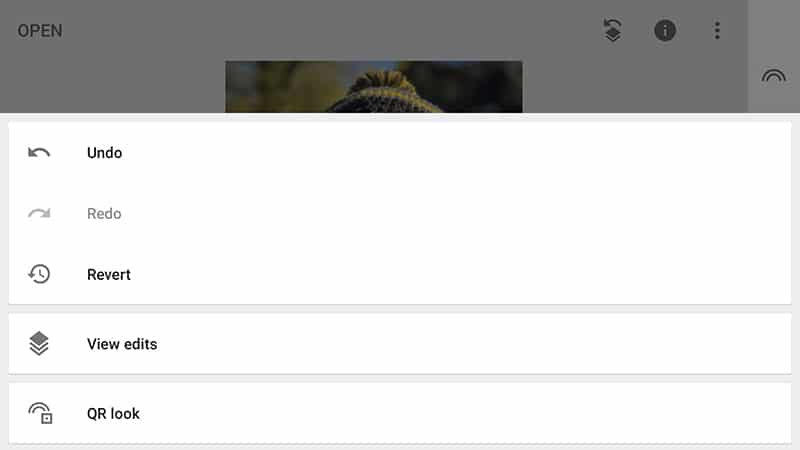
The next screen displays the list of layered edits that have been applied to the image.
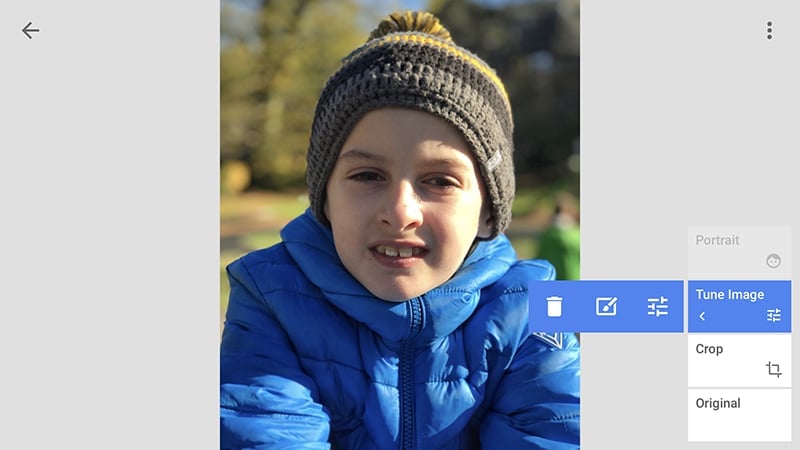
In this example, if I wanted to remove the Tune Image layer all I have to do is tap the ‘Tune Image’ edit to display some further options. This enables me to either go back in and edit the layer further, edit the layer by selectively masking areas of the image or deleting the layer altogether.
If, however, I decide I want to apply another tool to my Snapseed edit after the Tune Image layer, I simply select the Tune Image layer, then exit the Stacks menu by tapping the Back arrow in the top left corner. Next, I make the changes that I want to apply to my photo, in this example I add more contrast to the photo by using the Curves tool. After I’ve applied the changes, I go back into the Stacks menu where I can now see that the new edits have been added in above Tune Image but below the Portrait layer.
Final Thoughts
Snapseed has always been a powerful photo editing app and is certainly a personal favourite in my camera bag of apps. The app is an extremely versatile piece of software which removes the need to switch from app to app in order to edit an image. This saves you time and helps to keep your edits all-in-one place. It’s easy to see why Snapseed is now one of the most popular go-to photo editing apps out there.
If you haven’t already done so, download the app and try out some of the techniques outlined in this tutorial guide on your own photos.
![]()
![]()
One final tip – when you’re editing your photos, know when to stop! Don’t over edit an image. Remember – edit to enhance a good photo, not mask the flaws in an otherwise bad photo.


I’m a little late (3 months late) in commenting but I wanted to say that your tutorial was a tremendous help. I’m just a goofy dad who uses his phone to snap pictures of his kids for most the part, but being able to navigate Snapseed should go a long way in how those pictures turn out. Thanks.
Thank you for a very detailed tutorial. There are so many photo editing apps and they all operate differently, so I had missed some of Snapseeds features. I can now delete most of the apps and stick with Snapseed and VSCO for the filters 🙂
Absolutely magnificent, I find your tutorials simple to follow, you have some of the best online tutorials around. Thanks for the info and will be following up on your future posts.
Great tutorial. I use NIK in my normal work. Haven’t used the phone much, but the camera is in the shop, so I’ll give it a go.
really useful. thanks
great tool I love it
Excellent tutorial, thank you!
, thanks it was very informative
Is SnapSeed only an app? Can you get it on your PC?
Nope, we don’t yet have a version on PC – instead you could use Adobe Lightroom which is more powerful.
Hi Victoria, Snapseed is only available on iOS and Android. Unfortunately it’s not available for desktop computers
Yes you can get this for PC but the only way is by installing an app named Bluestacks. This is an android emulator for windows. Once downloaded it with show the google play store. Type in snapseed and Voila. All done.
Hi, is there a function to change background colors?
Hi Darryl, You could try using the white balance filter to apply an overall cast to the image, then go back into the ‘view’ edits’ feature and edit the cast using a mask. This will allow you to control which areas of the image have the colour cast applied to it. Admittedly, it’s not ideal and I think there are probably better apps out there for that sort of thing. You could try the Enlight app.
Being a novice to this editing & being familiar with Photoshop, Elements & Picasa3, I read this tutorial faster than any I’ve ever read and I think I understand it even before I attempt to use it. I was upset when Picasa3 disappeared in 2015/2016. But I had taken a hiatus from photography for a few years and did not discover until a week ago that Picasa3 was no longer around. It appears that this will replace it and make it mostly unnecessary to go through Photoshop’s tedious work to achieve results. Elements was good.
Last question: Is this only for cellphone cameras or can it be accessed and used with a Cannon or Nikon or other popular digital camera? –AF
Hi Alex, Snapseed is only available on iOS and Android devices so can’t be used with DSLR cameras. You’d have to import your photos to your iOS or Android device then edit them in Snapseed from there.
Magnificent approach to Snapseed, Andy.
I’m using an iPad mini 4 . Is it correct to assume that the Snapseed tutorial about using an iPhone with Snapseed would also apply my device as well ?
Please advise that this will be OK & then I will print off this tutorial . Many thanks ,John Lay
Hi John, It is a long time since I used Snapseed on an iPad but as far as I know the app works in exactly the same way on tablets as it does on smartphones.
Hello this app is very great app. But i will open tutorials from three dots there show “can’t load content” and say try again can i solve this.
Sounds like a device/internet connectivity issue