There’s one key aspect of photography that I’m extremely passionate about and that’s composition. A while back, I wrote a post called 10 Composition Tips to Take Your iPhone Photos to the Next Level. In that article one of the first photography tips that the article covers is the rule of thirds.
For me, the rule of thirds in photography was a game-changer. Once the penny dropped and I started to apply this rule, the standard of my photography dramatically improved.
In this article, I will take a closer look at the rule of thirds in photography. You’ll learn what the rule of thirds is, why it’s useful, when and how to use it as well as some easy-to-follow tips and techniques that will allow you to start taking better photos.
What is the Rule of Thirds in Photography?
Every photo needs to have a subject. Without one, a photo would lack interest or a clear focal point. The focal point is where the photographer wants the viewer’s eye to go first. In order to direct the viewer’s eye toward that focal point, we use composition, and this is where something like the rule of thirds comes in.
Simply put, the rule of thirds is a set of compositional guidelines that uses an imaginary grid made up of two horizontal and two vertical lines. According to the rule of thirds, positioning the most important elements of the scene, such as your subject on one of the grid lines or their intersection points, will create a more visually pleasing image.
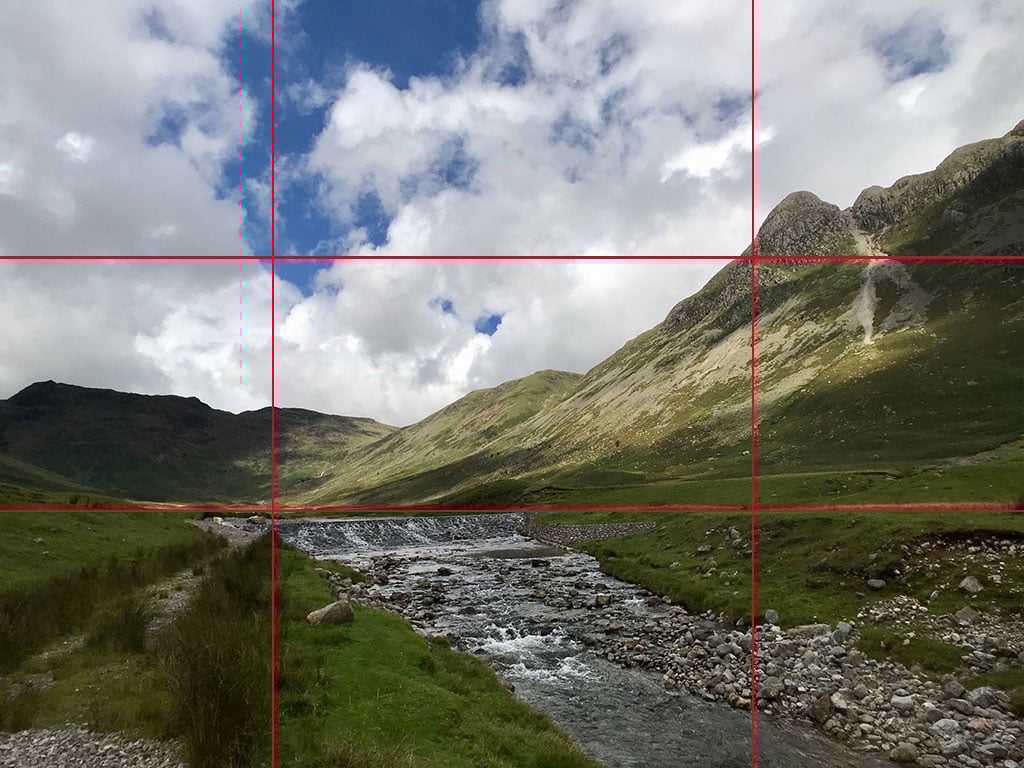
As you can see from the photo below, the rule of thirds grid divides the image into nine equal parts and four intersection points. Subjects placed on these grid lines or intersection points will help to add depth and interest to the photo.
Let’s take a look at a few examples. In this photo, iPhone photographer Arpita Upadhyaya, has positioned the young girl on the top left junction point. This has created a lot of empty space in the image, which helps to frame the subject and direct to viewer’s eye toward it.
Also, because the girl is running, the photo is more dynamic, so you really get a sense of movement in the image. Had the main subject been positioned dead center, then the resulting photo would have taken on a different feel and wouldn’t have been as nearly as powerful as it is now.
 2")
Photo by Arpita Upadhyaya
In this next example photo, the main subject is the girl. She has been positioned in the lower right corner of the frame. By placing the subject in this location, I managed to create a much more pleasing composition, and again, the subject has been framed by negative space. This is another photo that would not have worked had the girl been placed dead center in the frame.
 3")
Why is the Rule of Thirds Useful?
As you can see, the rule of thirds is a great way to add balance and interest to a photograph. Images that use the rule of thirds grid will tend to be much more aesthetically pleasing and balanced.
The rule of thirds in photography also helps to create tension between elements within the composition of a photo – for example, if a subject is placed on one side of the frame, then it can be counter-balanced with something on the opposite side.
Finally, the rule of thirds will help to develop your creativity and sense of composition by giving you a framework to follow as you begin to experiment with composition in your photography.
When Should You Use the Rule of Thirds?
So by now, you should have an idea of what the rule of thirds is and why you should be using it in your photography, but how do you know when you should be using it?
Generally, the rule of thirds should be used whenever you want to create a more dynamic or well-balanced composition.
The rule of thirds is perfect when shooting landscape photography, taking portraits, or any scene with an obvious foreground or background or when a large expanse of negative space surrounds your subject.
Ultimately, knowing when to use the rule of thirds in your photography will come with experience. It is only through experience and experimentation that you’ll get a better understanding of when the thirds rule will help to enhance a photo as you frame it.
How to Use the Rule of Thirds When Using an iPhone or Android Smartphone
1. Turn on Your Phone’s Rule of Thirds Grid.
When using a smartphone, be it iPhone or Android, you will first need to enable the rule of thirds grid. Doing so will overlay a rule of thirds grid on your viewfinder, giving you a visual aid that you can use when framing the composition of your photos.
To enable the rule of thirds grid when using the iPhone’s native camera app, go to Settings, then Camera. Under the Composition heading, make sure that the Grid toggle is enabled.
On an Android device, the process will be very similar. First, launch the camera app and tap settings. Next, look for the grid lines option and make sure the grid lines option is toggled to the ‘on’ position.
There are many other dedicated camera apps out there, all of which should allow you to enable rule of thirds grid on the screen. The main third-party camera apps that I would recommend are Camera+, ProCamera 8, VSCO, and Reeflex.
2. Place Your Subject on One of the Four Intersection Points.
As mentioned, placing your subject on one of the four intersection points really helps to create a more aesthetically pleasing, natural photograph. It also gives you the opportunity to use the surrounding space more creatively.
In the photo below, the white boat on the top left is the main subject. The boat has deliberately been positioned on the upper left intersection point, with the rope on the left-hand vertical line. This provides a leading line that helps to guide the viewer’s eye from the foreground toward the main subject – the boat.
 4")
Low tide by Andy Butler
When photographing people, try to line up one of your subject’s eyes with one of the intersection points and have them look directly into the camera. This will help to make a stronger and more intimate connection between the viewers and the subject.
3. Place Your Subject on Any Horizontal or Vertical Line
When shooting landscape photography, try placing the horizon line on the lower third intersection line. This will allow you to fill the rest of the photo with the sky. This will help to give the viewer a sense of wide open space in the scene.
If the sky also contains any interesting clouds, movement, or stormy weather conditions, then placing the horizon on the lower horizontal grid line will help to draw focus towards them.
For example, in the photo below, the lines of the beach and pier were placed on the lower third horizontal line. By filling the majority of the image with the dramatic lighting of the clouds and streaming shafts of sunlight, I was able to create an image full of drama.
 5")
If you have a lot of interest in the foreground, you may want to consider placing the horizon on the top horizontal line. This will place more emphasis on the foreground, which will draw the viewer’s eye into the scene.
You can also apply the same techniques when shooting cityscapes by placing the skyline on one of the horizontal lines, leaving more room for your foreground elements or to exaggerate a dramatic skyline. This will give your subject more context and even a sense of scale.
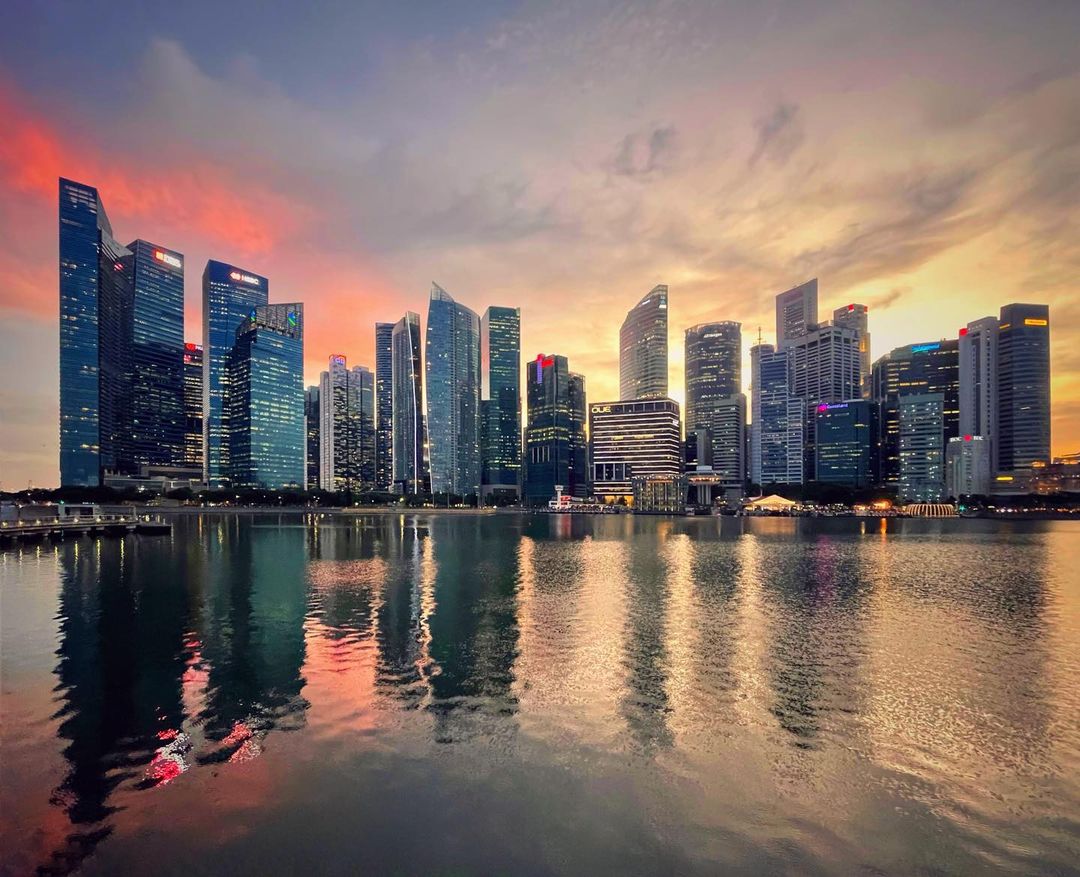
Photo by @bertatheexplorer
You don’t have to restrict yourself to using the horizontal lines in the rule of thirds grid, you can also make use of the vertical lines as well.
For example, if you’re photographing a large sprawling cityscape or urban setting, you can break it up into thirds by placing the main elements of the scene along one of the vertical lines on either side of the frame. This will help to create a more balanced and eye-catching composition in your photo.
4. Balance the Photo Diagonally
Thanks to the horizontal and vertical lines that make up the rule of thirds grid, a photographer also has the option to make use of the nine quadrant areas in the grid.
By using opposing quadrants, you can balance a photo by placing one subject in one quadrant and a second subject in the opposite quadrant.
For example, in the photo below, the main subject is the man on the right, and the secondary subject is the post rising out of the water on the left. By placing the subjects opposite each other, both the right and left sides of the image are balanced. This helps to create a much stronger composition.
 8")
In addition, it also helps that the man is pointing in the direction of the post, which further helps to strengthen the connection between the two key elements.
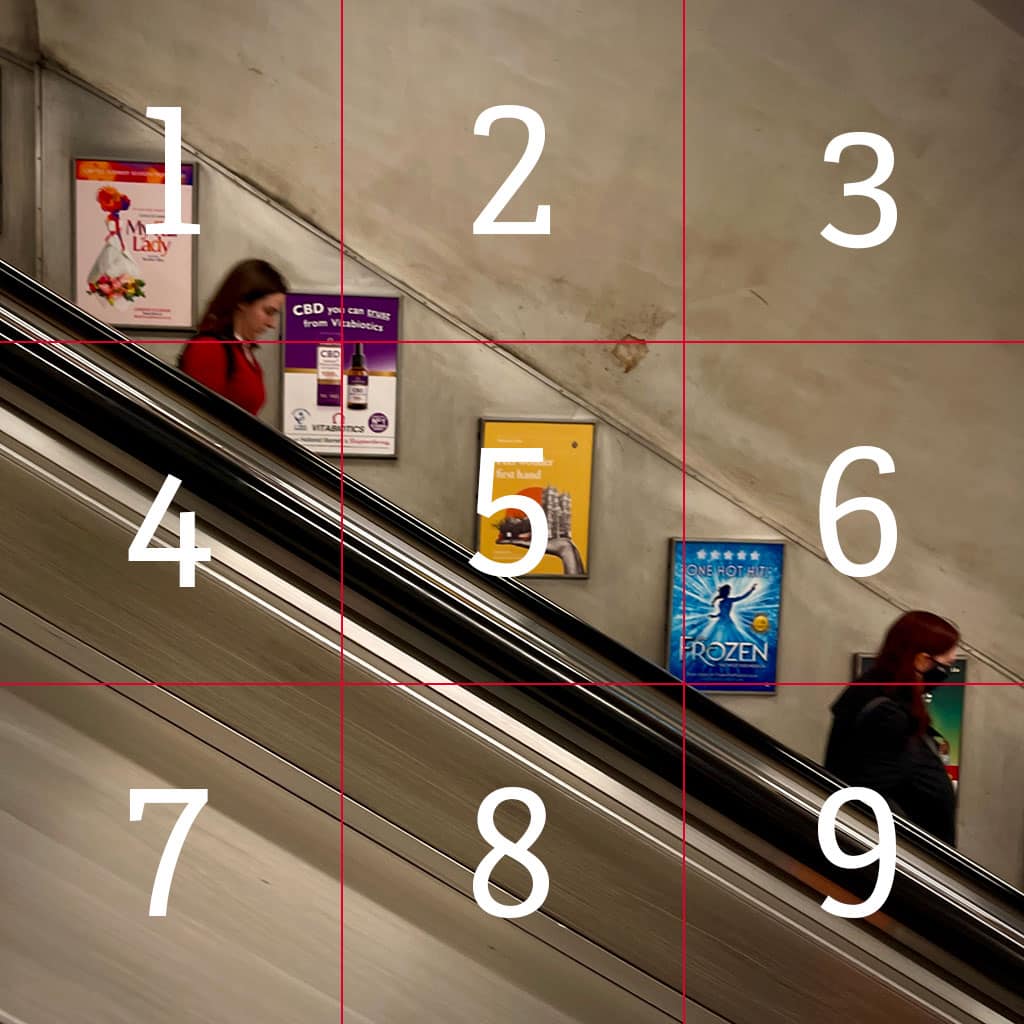
The below photo was taken from the stairwell of a tall building, looking down on a group of people as they pass by. The photo has a strong sense of balance thanks to the positioning of the group of people in the upper left quadrant and the position of the boy in the lower right corner of the frame.
 9")
How and When to Break the Rules of Thirds?
Despite its name, the rule of thirds is only a set of guidelines, which aren’t hard and fast rules that must be adhered to no matter what.
Knowing when is the right time to break the rule of thirds will really depend on the scene and what you’re trying to capture. If, for example, you’re photographing a symmetrical architectural structure, like a cathedral or monument, then it may be more aesthetically pleasing if you place your subject in the middle of the frame rather than on an intersection point. This will help to draw focus to the grandeur of your subject.
Alternatively, if there’s a strong supporting element in your shot that you want to emphasize, then you may decide to place it off-center to leave more space around it, especially if no other elements are competing for attention in the frame. This can be especially effective when shooting landscape shots or wildlife photography.
In this next image, I captured my son walking down a narrow alleyway in the seaside town of Tenby in North Wales. With the subject dead center, it allowed me to frame him on both sides by the dark shadows of the surrounding buildings. This means the eye is naturally drawn to the center of the image.
Although the subject isn’t strictly placed on the rule of thirds grid, the image still works well as the surrounding buildings have been placed on the outer quadrants of the rule of thirds grid. This helps to create balance in the scene. The result is captivating and draws the viewer into the scene.
 10")
Photo by Andy Butler
Final Thoughts About the Rule of Thirds in Photography
To conclude this look at the rule of thirds in photography. Remember, the rule of thirds is a useful tool that will help you to create more aesthetically pleasing and ultimately better compositions. As I mentioned at the beginning of this article, for me, the rule of thirds was a game-changer. Once I started to apply it to my photography, it elevated the standard of photos that I was taking.
It is also important to be in mind that although it is called the ‘rule of thirds’, don’t think of it as a set of hard and fast rules. Rather, use it as a general set of guidelines that can be adjusted according to the situation you are in.
By understanding when and how to use the rule of thirds in your own photographic endeavors, you will soon find that you can quickly and easily start creating unique and striking images. The key is to practice and experiment. This will help you understand what works and doesn’t work, which will make you a more proficient and confident photographer.


