Timelapse photography has become increasingly popular over the last few years due to the unique way it allows you to capture the passage of time, transforming long periods of activity and condensing them down into a few captivating seconds. It essentially captures a series of still photos at set intervals and then plays them back at a higher speed, giving a video appearance. The result creates a stunning visual narrative highlighting the changes and movements that are often missed in real-time.
Thanks to the compact nature of the smartphone and its constant presence in our pockets, for many, it has become the ideal tool for spontaneous and convenient timelapse shooting.
Recently, I’ve been using a relatively new app called Reelapse to shoot some timelapse videos.
Reelapse is a new iPhone app from Reeflex, the developers behind camera apps like Reeflex, Reeheld, and ReeXpose, as well as their stunning range of G-Series iPhone lenses.
Reelapse specializes in the capture of timelapses by giving the photographer full control of the camera settings, which is not the case with many other timelapse app out there. I’ve been using the app for a while now and have been impressed by the results, but before we get into the nitty-gritty of using the Reelapse app, let’s take a moment to consider what we need to do when planning a timelapse.
Choosing the Right Subjects for Timelapse Photography
One of the most crucial aspects of timelapse photography is selecting the right subject. Good subjects typically exhibit noticeable changes or motion over time, providing a dynamic visual experience. Natural phenomena like sunsets, sunrises, and cloud movements are great subjects because they showcase dramatic changes in light and color that will capture the viewer’s attention with their inherent beauty and unpredictability. Similarly, the blooming of flowers or the ebb and flow of tides can also offer mesmerizing transformations that are perfect for an interesting timelapse.
The Urban environment also presents an excellent array of time-lapse opportunities. For example, the hustle and bustle of a city street, with cars and pedestrians moving in choreographed chaos, can create compelling visual narratives. Even everyday activities, like a busy marketplace or the gradual shift from day to night in a cityscape, can be turned into captivating timelapse sequences. These subjects work well because they reveal patterns and rhythms that are not immediately obvious in real-time viewing, making the ordinary appear extraordinary through the lens of timelapse photography.
Considerations for Composition in Timelapse Photography
Next, we need to consider the composition of our timelapse. In this regard, there are several key considerations to keep in mind to ensure your final result is both visually compelling and engaging.
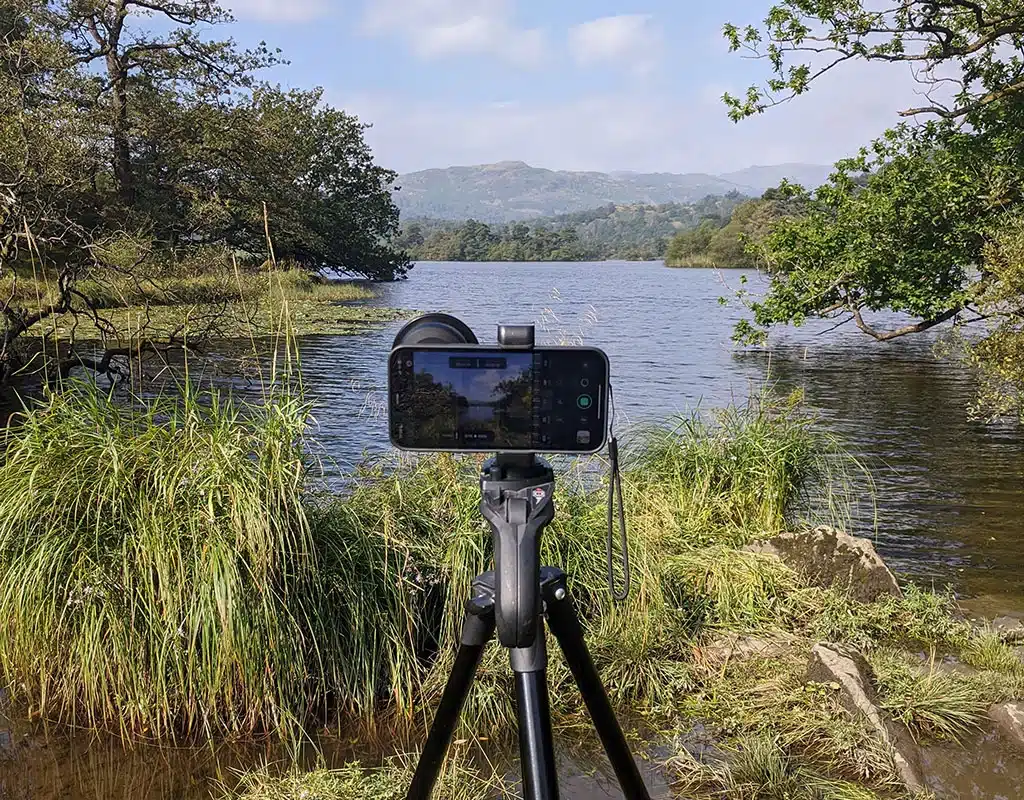
Firstly, stability is paramount. Since timelapse involves capturing numerous frames over an extended period, any camera movement can disrupt the sequence, resulting in a shaky, disjointed video. Using a sturdy tripod or a stable surface is essential to maintain consistency in your shots.
Secondly, framing your subject is crucial. Decide what the focal point of your timelapse will be. You then need to ensure that your subject remains prominent throughout the sequence. For example, if you’re capturing a sunset, make sure the horizon is level and the sun is positioned thoughtfully within the frame to avoid unnecessary distractions.
Foreground interest can significantly enhance your timelapse composition. Including elements like trees, buildings, or people in the foreground can add depth and context to your video, making it more engaging. These elements should complement rather than compete with the main subject.
Consider the rule of thirds to create a balanced and aesthetically pleasing composition. You can create more dynamic and interesting compositions by dividing your frame into thirds, both horizontally and vertically, and placing key elements along these lines or at their intersections.
Anticipating movement is another vital aspect of timelapse. Consider how the scene will change over time and compose your shot to accommodate these changes. For example, if you’re capturing traffic, position your camera to show the flow of cars moving through the scene rather than having them move directly towards or away from the camera.
Finally, consider the lighting conditions, as this can dramatically affect your timelapse. Be mindful of how natural light changes over time, such as the shifting colors during golden hour or the stark contrasts created by shadows moving across a landscape. Plan your shoot to take advantage of these lighting changes, enhancing the visual appeal of your timelapse.
How to Shoot a iPhone Timelapse Using Reelapse
Now that we have an understanding of what makes a compelling timelapse let’s take a closer look at the Reelapse app.
The Interface
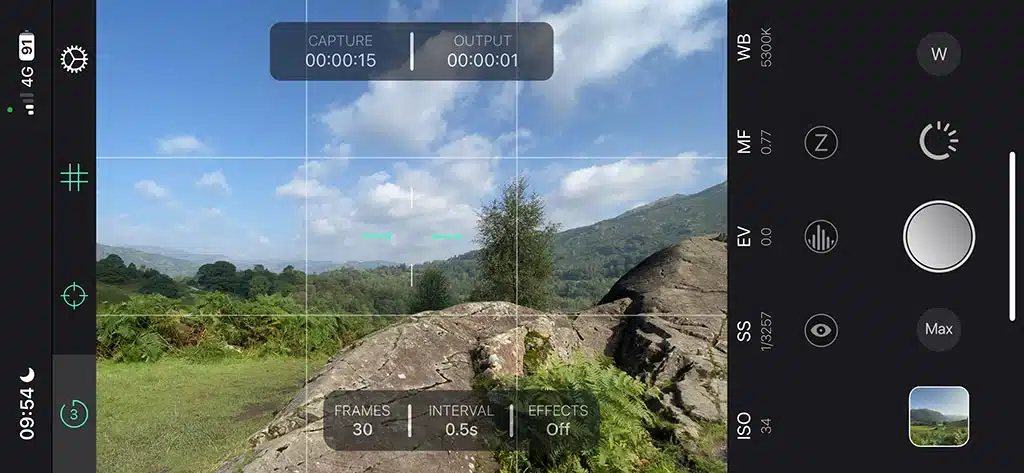
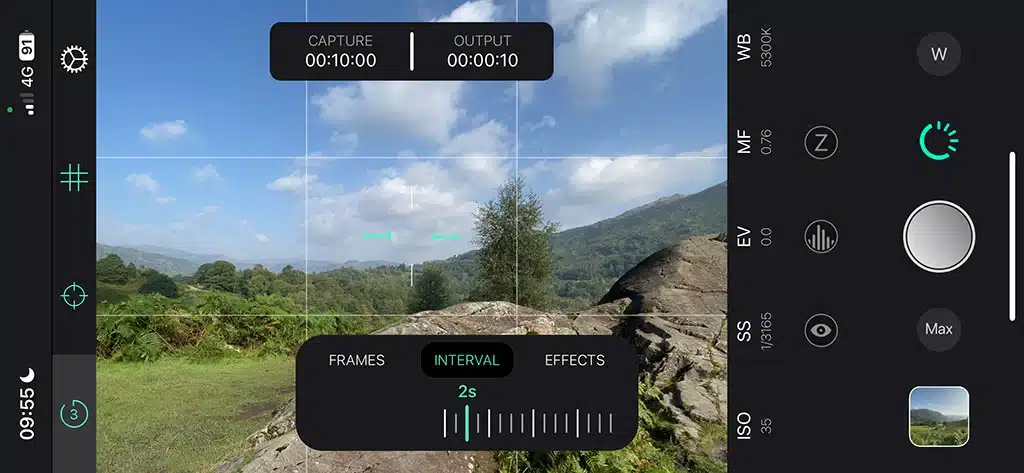
The interface layout of Reelapse is well laid out without being cluttered by unnecessary features. At the top of the screen, you will find the controls for useful visual aids, such as the delay timer, levelometer, grid lines and app settings.
Looking at the app setting options, I would highly recommend going into the Reelapse app settings and tapping Video Options, you have the option to enable a backup feature. This will save a backup video of your recording to the iPhone Files app in case the video does not save to your camera roll (which can happen). There is also an Energy Saving option which dims the screen while the timelapse is being recorded. However, I found this option frustrating as, in some lighting conditions, I couldn’t see how things were progressing or when the timelapse had finished recording.
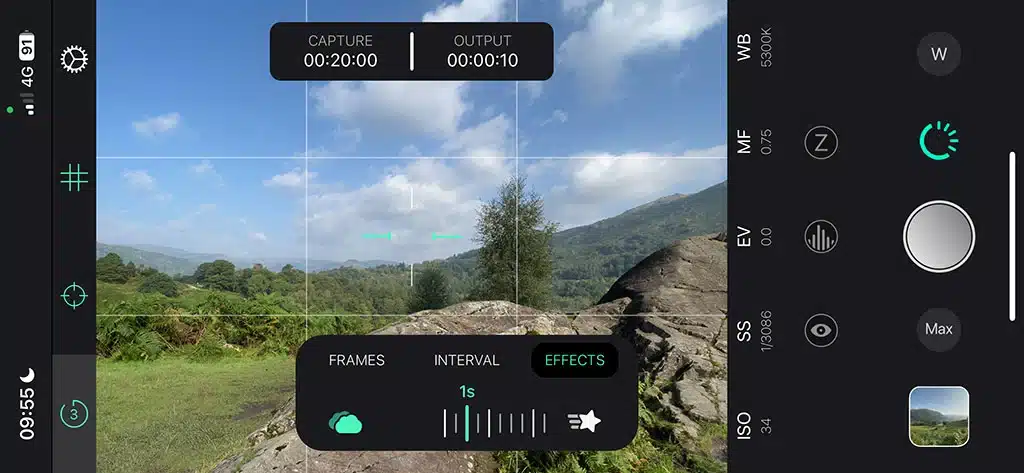
The main part of the screen is given over to the viewfinder. At the top of the viewfinder is a display showing the capture time and the end result duration. At the bottom of the viewfinder, you will find three controls that govern how your timelapse will be recorded. These options include the number of frames that will be captured, the interval between each frame, as well as details of any effects you may choose to add. More on these controls shortly.
Below the viewfinder, you will find the controls for the various adjustment settings you can pull to control your timelapse. These include ISO, shutter speed, exposure compensation value, focus, and white balance.
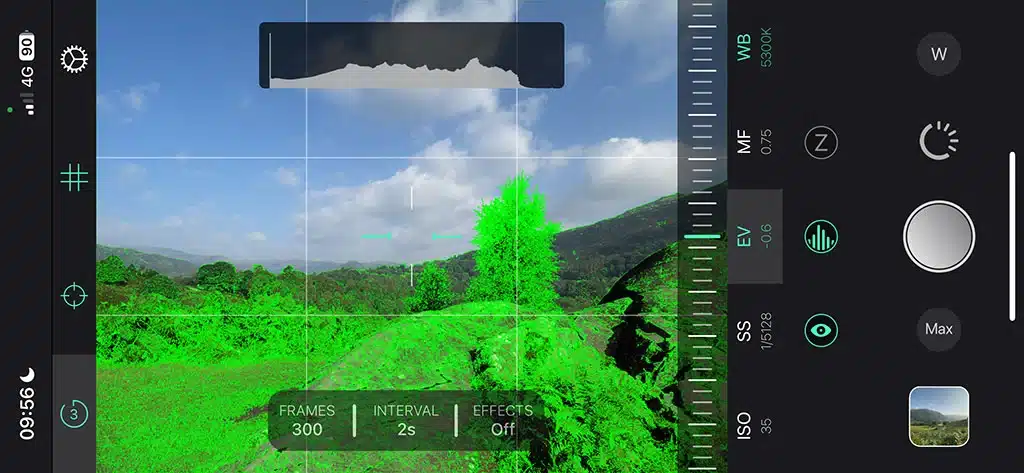
Moving further down you will find some visual aid options to highlight areas in focus with zebra peaking and areas that are overexposed, as well as an option to display a histogram of the overall exposure levels in the frame.
Finally, at the bottom of the screen, you will find the all-important shutter release button as well as options to access the photo gallery and change the image quality and lens selection.
Setting Up the Timelapse
Once I have the iPhone set up on a tripod and my composition framed, I start by tapping the screen to auto-set the focus and exposure levels. From this starting point, you can then make adjustments to the various settings, such as EV, focus, or white balance. If you need to reset things, simply double-tap the screen.
For my timelapse, I reduce the EV setting slightly to bring out more contrast in the scene. I do this by tapping EV, then dragging the slider to the right (or upwards if in a horizontal position). I then lock the white balance by tapping the WB settings and moving the slider slightly.
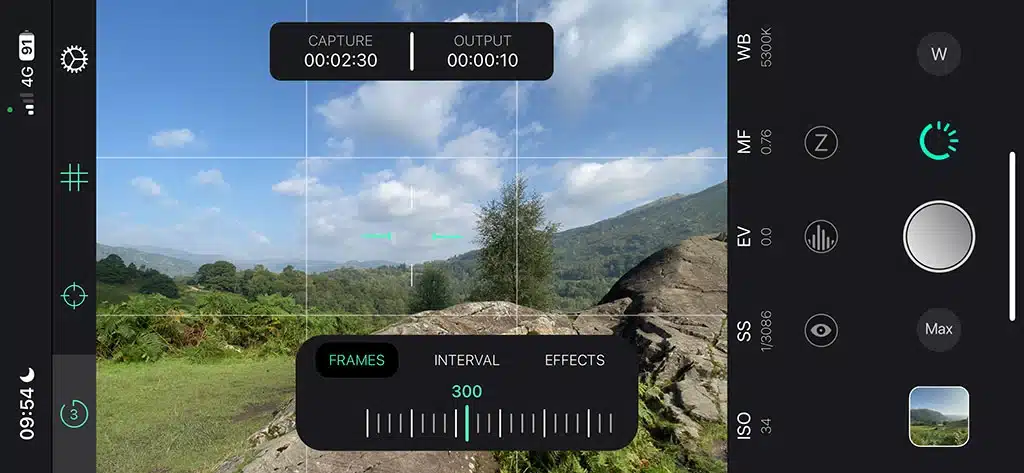
Next, I start to configure the timelapse settings. To access these settings, tap the circular icon next to the shutter release button. This will highlight the Capture/Output timings as well as the Frames/Interval/Effect options.
To control how long it will take to capture the timelapse, select Frames and then increase the number of frames. This will then show you how long the recording will take, along with the duration of the end result. So for example, to capture a 1 minute timelapse, it will take 15 minutes to record, with a 0.5 second delay between which frame.
Next, you can select the interval between each frame. If I increase the delay to 4 seconds, the output remains the same, but the capture time increases to 2 hours.
As a rule of thumb, when shooting subjects with slower motion, you’ll want to increase the interval time between frames. For faster-moving subjects, a shorter time interval will help smooth things out.
For my timelapse, I set the interval to 2 seconds.
Finally, Reelapse has an Effects option. This allows you to add a motion blur effect to each frame as it’s captured. I absolutely love this feature, as it helps soften the timelapse and gives it a more natural look and feel that sets the app apart from others I’ve used in the past.
Adjusting the blur effect setting will add more time to your capture time, so if I were to increase the effect capture time to 1 second, then my 1-minute timelapse would now take 3 hours to capture.
How you set these timelapse settings is entirely up to you and what subject you are shooting, but this is where the fun begins with timelapse photography. You never know what the end result will look like, but as you become more experienced, you will learn more about the best settings to use and when.
Once I have my timelapse settings dialed in, all that’s left to do is tap the shutter delay time to 3 seconds to avoid any unwanted camera shake. Then, tap the shutter release button before sitting back to relax and watch the world go by. I think there is something therapeutic about this aspect of the process: watching the world pass by while you capture your timelapse. I find it to be a lovely sort of mindfulness.
Once the timelapse has finished recording, tap the photo gallery icon to view your timelapse.
Final Thoughts
The beauty of timelapse photography lies not just in the final product but in the process itself. It is a form of photography that requires patience. It encourages you to slow down, observe, and appreciate the subtle transformations that happen all around us – changes that are often too gradual for the naked eye to perceive. The Reelapse app enhances this experience by making the process straightforward and accessible, allowing me to focus on the artistic elements rather than getting bogged down by technical details.
I have been very impressed with the app. Its interface is easy to use, and its powerful features allowed me to create professional-grade timelapses with minimal effort. For me, the Effects setting is the standout feature of the app. It is the secret sauce that can give each timelapse a creative edge.
So, if you’re passionate about capturing the passage of time in a visually compelling way, Reelapse is an excellent tool to have at your disposal.
Reelapse is available in the Apple App Store and costs just $6.99 with a yearly subscription. For $14.99, you can have lifetime access, which I think is well worth it, especially considering the level of pro features and quality you get.

