Do you ever find yourself looking at one of your photos and think it doesn’t quite capture the entire atmosphere of the moment? Live Photos is an innovative feature offered by the iOS camera app which captures a few seconds of video footage before and after each photo you take. It’s simple to set up and the results can really be quite special. In this article you’ll learn how to shoot, view, edit and share your iPhone Live Photos.
Live Photos? What is it and how does it work?
iPhone Live Photos is an amazing feature introduced by Apple at the launch of the iPhone 6s – and of course it has been available on all models since. In simple terms, when you take a photo it also captures a short video clip. So as well as a still photo you get a video clip (with audio) of up to three seconds in length.
The three seconds of video starts 1.5 seconds before the photo was taken and ends 1.5 seconds after the photo was taken.
You might wonder how the iPhone knows when to start recording. By the time you press the shutter surely it’s too late? Well, this is the clever bit, the iPhone starts recording video as soon as you open the camera app – so it’s always recording video.
Fear not – this won’t cause your iPhone to run out of space. The iPhone automatically discards any video that is older than 1.5 seconds – because it knows it won’t need it. As soon as you press the shutter to take a photo only most recent 1.5 seconds of video is preserved, with another 1.5 seconds of video footage added to make up the three seconds of Live Photo.
Behind the scenes the camera app actually saves two files to your iPhone – a .JPEG image file for the still image and a .MOV file for the three second video. However, the Photos app doesn’t show both files – it just shows the JPEG version and, upon interacting with it, displays part or all of the three second video.
Why would you want to use it?
The best thing about a still image is also the worst thing. It’s a momentary snapshot – with no movement or sound. When we look at the photos we’ve taken we have to rely on that one fleeting frame and our fading memory to recall the atmosphere – the sounds – the motion. Of course a good photographer will be able to capture a sense of this in the still image – but for most of us we’re left wanting.
Sure, we could just record a video separately to the still image – but it’s an extra step and takes a little longer. Live Photos does it all for you – giving you this three second video with sound which really helps remind you what the atmosphere and mood was like at the time:– children laughing and playing together; a babbling brook or a waterfall; a flock of geese flying noisily overhead; the party atmosphere of birthday cake candles being blown out – all captured in a three second video – and you get your still image captured too.
Tip: Live Photos work best if there is some movement involved – either of the camera or the subject. Just remember that you are trying to take a photo, not a video – so it’s important that there isn’t too much movement of the camera or subject if you want to avoid undesirable blurring.
How to create your Live Photos
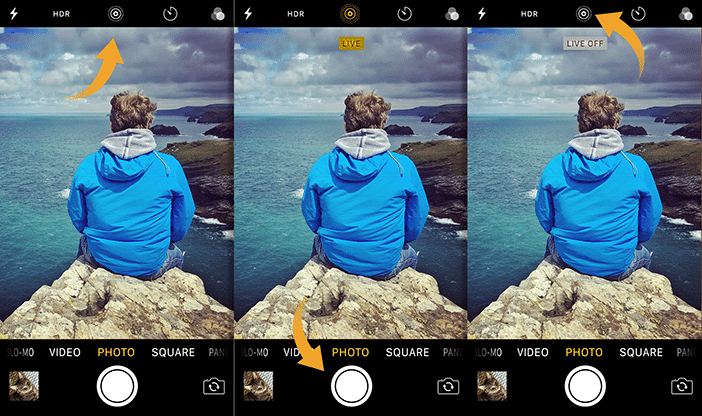
It’s really easy to start using Live Photos. Ensure you are in ‘Photo’ mode (not Time Lapse, Pano, Slo-Mo, Video, Square etc). Live Photos is enabled by default but it’s worth checking that the Live Photos icon is highlighted in yellow in the native camera app. If not, just tap it once. It looks like several circles nested inside each other. Once it’s highlighted you’re ready to create Live Photos.
Now, simply take a photo as you normally would.
You’ll want to remember that the camera will capture everything it can see and hear for the 1.5 seconds before and after you hit the shutter button. Therefore, frame your shot, then wait at least 1.5 seconds before taking the picture. As soon as you press the shutter button the word ‘LIVE’ appears on the screen in yellow. After 1.5 seconds it will disappear, telling you the Live Photo has been captured and you can safely lower your iPhone.
If your subject is stationary consider gently panning across the scene – but make sure the movement doesn’t cause your still image to be blurred.
If your subject is moving you could keep the camera still and get great results because Live Photos will capture the subjects movement nicely.
It’s a good idea to avoid barking instructions at your subjects for the 1.5 seconds before you press the shutter button as you may not want your voice ruining the ambience of the three second video!
You should consider whether or not Live Photos is something you want to use all the time. Even though the video clips are just three seconds long, they can take up a lot of space – often as much space as the still image. If space is tight you might want to leave Live Photos switched off and just activate it as and when you need it.
You can force the camera app to remember your preferred Live Photo settings by going to Settings > Photos & Camera > Preserve Settings and you’ll find Live Photos at the bottom of the list.
Viewing your Live Photos
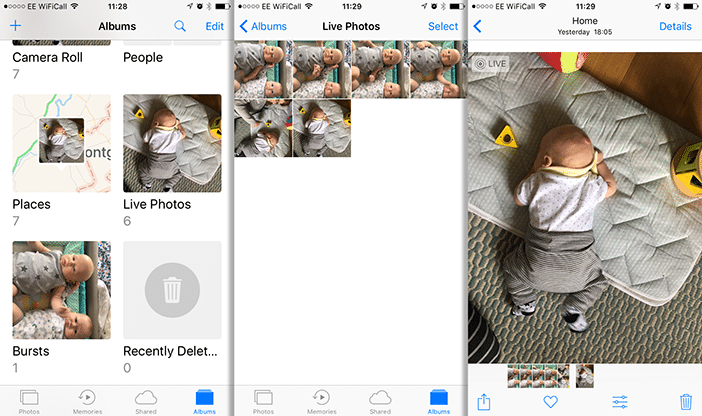
The resulting Live Photo appears in your native Photos app. Just go to the ‘Camera Roll’ album or the ‘Live Photos’. Annoyingly, in thumbnail view, it’s not obvious which of your captures are Live Photos until you tap on one – although when in the ‘Live Photos’ album it’s fairly safe to assume all the images are Live Photos.
As with regular still photos and videos tapping on a thumbnail brings the Live Photo capture up large and an icon of concentric circles next to the word ‘LIVE’ is displayed at the top-left of the image.
To view the full 3 seconds of Live Photo tap and hold on the image. As soon as you release If you swipe through your album, any Live Photos briefly play for a fraction of a second which tells you it’s a Live Photo. This is useful because in full-screen mode you aren’t shown the ‘LIVE’ icon.
Editing your Live Photos
Since iOS 10 you can edit the Live Photo – keeping the video intact. iOS 11 also lets you choose which video frame to use as your photo. You can use the native Photos app to edit the still image just as you would any other still image. If you decide you don’t like the edits you can simply click ‘Revert to Original’.
Third-party photo editing apps might cause the three second video to be lost – so use these with caution.
Sharing your Live Photos
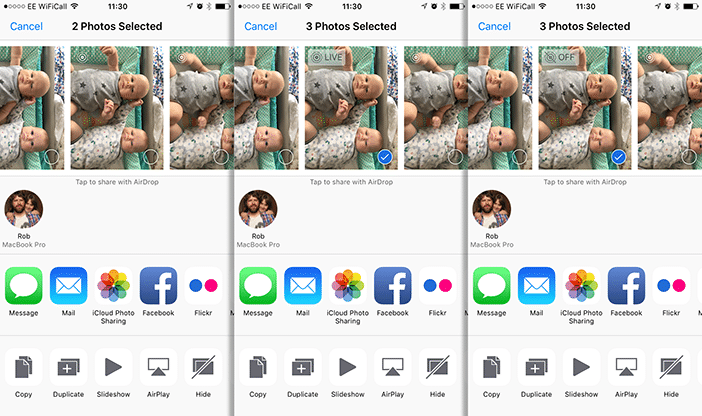
It’s easy to share your Live Photos with other iOS devices – just share them as you would normally share a still image or a video – tap the ‘Share’ icon and select any Live Photos, still images or videos you want to share.
You can decide whether you want to share the Live Photo – complete with the three second video and still image – or just the still image (including any edits). This is done by tapping the ‘LIVE’ icon displayed at the top-left of each thumbnail as you are selecting things to share.
Sharing of Live Photos with other iOS users can be via Airdrop, iMessage or iCloud sharing – but note Live Photos cannot be sent via email – the recipient will just receive a JPEG of the still image. Users of pre iOS 9 devices or devices not capable of displaying Live Photos will not be able to see the Live Photo video – they’ll just see a still image in JPEG format.
Several social media platforms allow the upload and sharing of Live Photos – although some require the use of workarounds. These currently include Facebook (only from within the Facebook app), Instagram (using the ‘Your Story’ feature), Tumblr and Twitter.
If all else fails, the Image Capture app on a Mac (and similar apps on other platforms) can access both the .JPEG and the .MOV files associated with the Live Photo and either of these can be uploaded to any social media platform that accepts still images or movies.
Summary
So, we’ve learned what Live Photos are and discovered how to create, edit and share them. With a little practice you’ll find your Live Photos are a welcome addition to your photo galleries.


Live Photos is an impressive feature that can regulates motion on images using touch swipe gestures. I used an app called “Movense” ( http://www.movense.com/ ) which you to click a Live Photo by capturing a few seconds of video when you are taking a photo on your phone.
Keep this lesson