Following on from last years successful ’24 Mobile Photographers Til Christmas’ series and to celebrate the forthcoming festive season and another year in the timeline of Mobiography I have decided to repeat the series and showcase the work, thoughts and insights of 24 talented mobile photographers. Each featured photographer has inspired and supported me in one way or another during the course of the past 2 years and I will be asking them to offer an insight into their photography, to reflect on their year gone by or plans for the coming year ahead.
Each day until Christmas Eve we will be featuring one photographer in a sort of online advent calendar so to speak.
Today’s featured photographer is Bob Weil
Win free access to iPhone Artistry
To mark the start of this years ’24 Mobile Photographers’ series, Bob Weil has kindly offered to give away FREE ACCESS to his superb online video course, ‘Mobile Artistry’ (both iPhone and Android apps included) to one lucky reader. (You can learn more about the course by visiting www.iPhonePhotoArtist.com or AndroidPhotoArtist.com).
To be in with a chance of gaining access to the course all you have to do is leave a comment at the bottom of this article including your name and email address. This competition closes of 24th December 2014.
My top tips or words of wisdom for aspiring mobile photographers and artists are…
How to create a surreal collage from unrelated images
As an iPhoneographer, I have been very blessed this year. This last summer, I launched on an online video course, and I have been overwhelmed by the outpouring of emotion as people described to me how profoundly it affected their lives and their creative output. Co-authoring the book (The Art of iPhone Photography) was certainly very gratifying, and co-managing our Flickr group and associated iPhoneographyCentral.com continues to be a joy. But nothing in my past experience prepared me for effect I’ve been able to have on helping people connect, or reconnect, with their creative muse through iPhone photography.
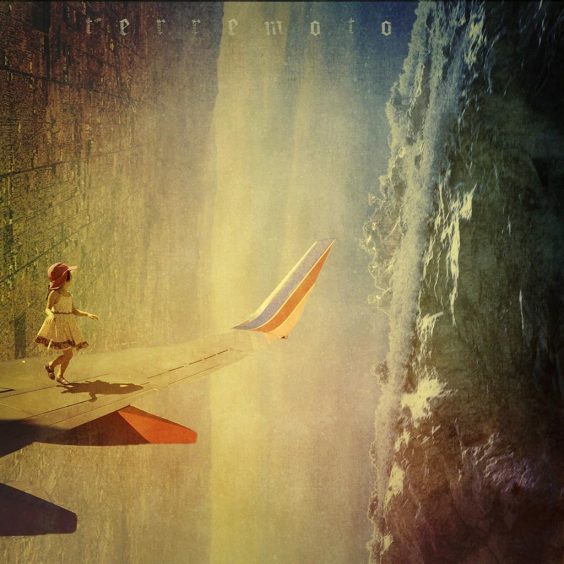
Since Christmas is a time of giving, I want this to be less about me, and more about your readers – so, here is a tutorial describing how I created the nearby surreal image: Terremoto diabólica.
What you’ll learn
Inspired by a bit of poetry, my goal was to create a fictional reality from stray images on my camera roll. This tutorial will show you how to blend four disparate photos together to create something new, and further evoke an otherworldly mood using texture and color.
What you’ll need:
- Photogene2 (or other photo editor)
- Superimpose (or other layering app)
- Leonardo (or other app with texture filters)
- PixlrExpress+ (or other app with de-contrast filters)
- LoMob (or other app with image filters)
- Photoshop Touch (or other app that supports cloning)
- Over (or other app that allows addition of type)
Back Story:
I had just returned from visiting a client in Utah, and had taken a few intriguing pictures using the native iPhone 4s camera from my window seat. I sat over the wing, and watched the fascinating changes in terrain unfold as I flew back to Southern California. Earlier, I had taken pictures of a snow-covered and mist-wreathed mountain range in Park City. I felt like there was something that I could do with these images, but I needed one more thing to give these images real impact – a human being that I could place into the scene (knowing that no people would be harmed in the process).
One of the contributors to our book, The Art of iPhone Photography, had created this wonderful and wistful image of a man riding on a cloud, so I decided I would create something equally stunning (if a bit darker) in the friendly skies.
Coincidentally, I just found that a fellow student in my college creative writing class had published a book of poetry some 20 years before, and I read it – mesmerized. I immediately understood why hearing her read her short story in front the class had convinced me to give up creative writing forever. I couldn’t shake the impression conjured up by a bit of verse from one of her poems:
“After the earthquake this morning, the day broke sizzling with monstrous clouds to the east – what Mama once called ‘earthquake weather.’ I stood in the doorway until the windows quieted, and went back to bed, sleeping easily, rocking, anchored through dreams to the shifting plate. All disasters are natural, the flood fills. No one knows what to die of.”
– Killarney Clary, poem from Who Whispered Near Me.
I suddenly knew what the final image needed to be – a child I could place in imaginary jeopardy. I found an image of a young girl prancing around a local mall that I had taken several years before and saved in my Assets folder (where I park interesting images I don’t yet know what to do with). I was drawn to her playful spirit, which would be deliciously out of place in the scene that was starting to take shape in my mind.
Step 1 – Rotate the two images
Since this was to be a surreal piece, I wouldn’t do to have the sky and ground plain look “normal”, so I rotated the mountain range (figure 1) in Photogene2 and cropped and rotated the sky/ground image so that they were both vertically oriented.

figure 1
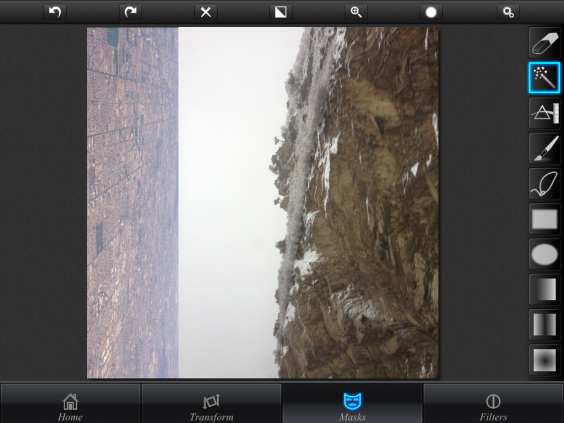
Figure 2
Step 2 – Combine the first two images and layer in the remaining two
Using Superimpose, I combined the sky and mountain range into a new, completely improbable image – this would be the “base” upon which I would build my final composition. In figures 3 and 4, you can see how I positioned the mountain vertically and used the magic want selection tool to select and remove that image’s overcast sky.
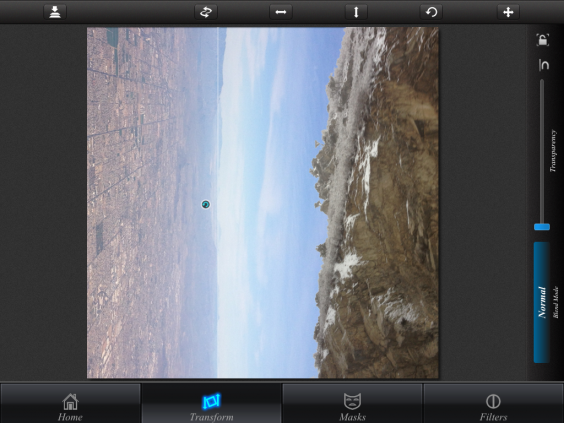
figure 3
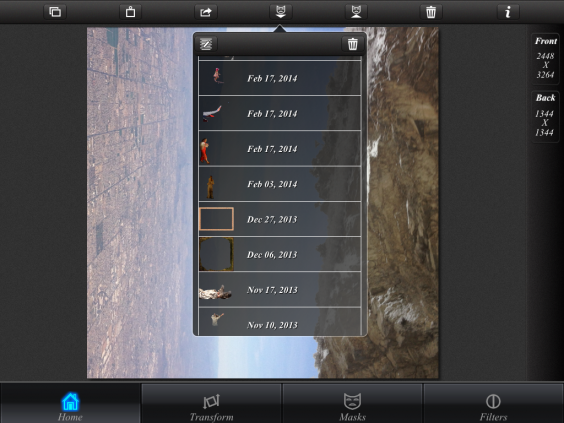
figure 4
Still in Superimpose, I selected the saved masks drop down, seen here in figure 4 (you can see small thumbnails of the little girl and the airplane wing). Prior to beginning this exercise, I had used the lasso selection tool to remove the image of the airplane wing and the little girl from their backgrounds of their respective images. Superimpose has this wonderful feature that allows you to save masks (portions of images) that you can later place on top of other images. I positioned the girl so that her shadow fell across the wing, and angled more toward the vertical, as shown in figure 5. The shadow was a delightful bit of verisimilitude that would help deceive the viewer’s eye into halfway believing the scene was real.
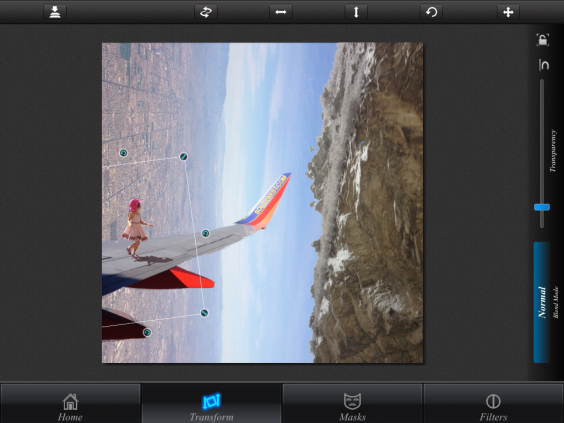
figure 5
Step 3 – Adding tonality, vignette and texture
As seen in Figure 6, I then used Leonardo to apply texture #3. This texture simultaneously added a vignette and lent the mountain range and sky a range of colors that increased the sense of mystery and took the scene another step away from reality. Leonardo allows you to adjust the percentage of the effect, and I settled on about 50% (the full texture can be rather harsh and overdone).
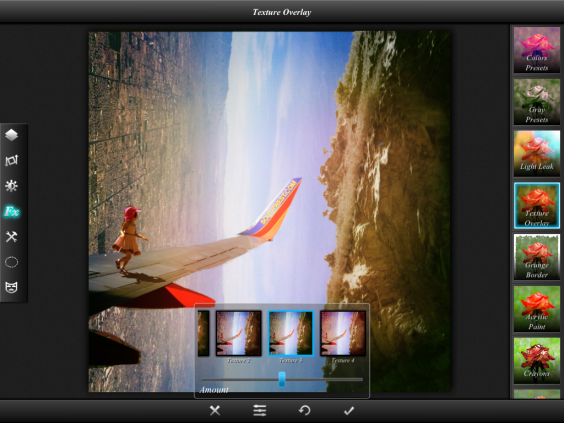
figure 6
Step 4 – Reduce contrast
I then opened the image in PixlrExpress+ and selected the Carl filter from the Vintage set (figure 7). These filters mute the colors, but also have the additional effect of reducing contrast. When you’re piling filters over top of an image (often called “appstacking”), it makes sense to draw down the contrast a bit so that the image doesn’t end up “overcooked” from too much processing.
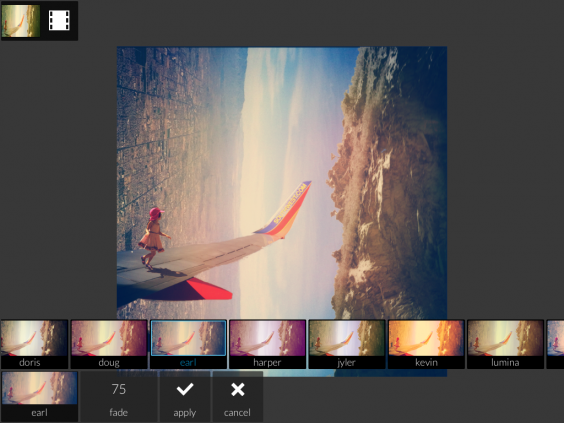
figure 7
Step 5 – Unify the color palette and add grit
I then opened the image in LoMob, and selected the 35mm MF Overlapp 1 filter as shown in figure 8. It’s important, once you’re done combining images from multiple sources, to use a filter or texture that makes all the elements look like they belong together, and weren’t tacked on. There are any number of programs that will do this, but I’ve grown fond of this particular filter, and the fact that it also adds a very intriguing grain to an image. This is especially important if you want to enlarge the image later for printing, and don’t want to see the jpeg artifacting from repeated saving of the file after each step.
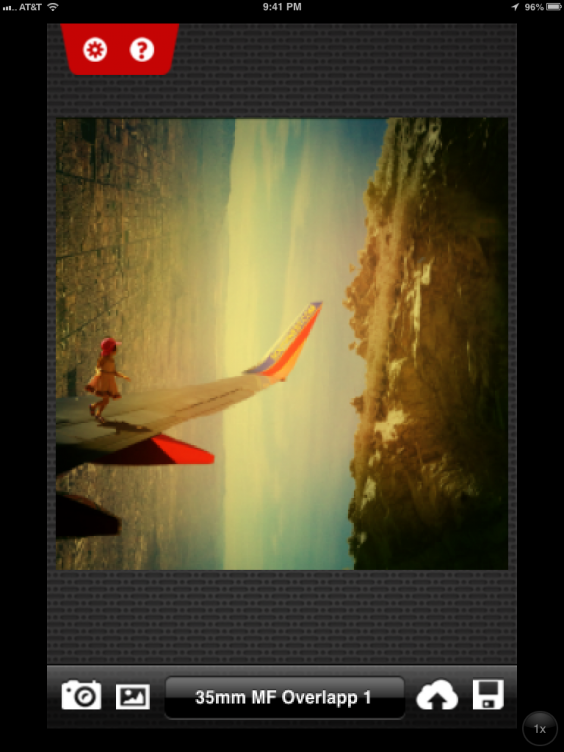
figure 8
Step 6 – Add type
There’s a fairly new type app on the scene called Over that I find really interesting – you can email yourself fonts to your iPhone or iPad and import them directly into the app (how’s that for cool?). I had a grungy German blackletter-style font called Faith Collapsing (you can download it here for free on DaFont.com) that I was looking for an excuse to use. I don’t often add type to images, but I decided to use the Spanish translation of earthquake (terremoto) and use this font to title the image. Over lets you set the letter spacing, color and transparency, which allowed me to get exactly the effect I was looking for.
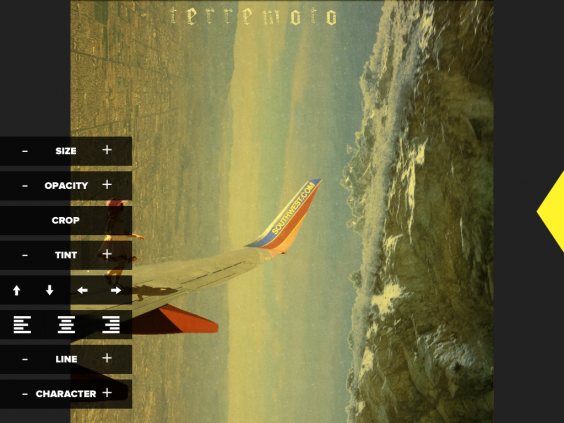
figure 9
Step 7 – Remove the name of the airline from the wing
After all this work, I suddenly realized what was front-and-center in the pre-final image – the name of the airline on the tip of the wing. This wouldn’t do at all – the surreal effect of the image would be totally lost if I allowed this to remain. I opened Photoshop Touch, which has probably the most amazing selection and cloning tools available on the iPad, and proceeded to obliterate the lettering using the cloning brush, as shown in figure 10.
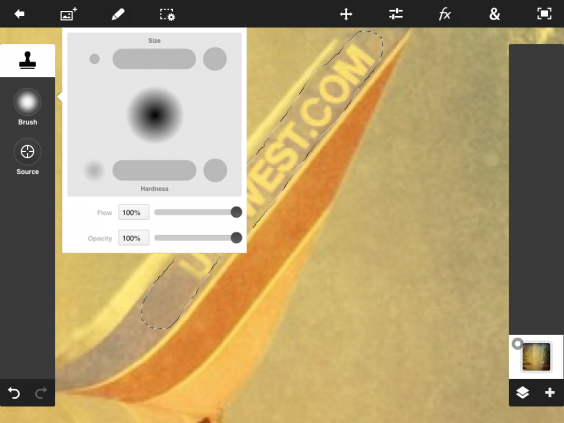
figure 10
Connect with Bob Weil
www.iPhoneographyCentral.com | iPhone Artistry | Flickr | Pinterest | Vimeo
Win free access to iPhone Artistry
Remember, one lucky reader will win FREE access to Bob Weil’s superb online video course, ‘Mobile Artistry’ (both iPhone and Android apps included). (You can learn more about the course by visiting www.iPhonePhotoArtist.com or AndroidPhotoArtist.com).
To enter simply leave a comment below including your name and email address. This competition closes of 24th December 2014.



I thoroughly enjoyed this article Bob and would love a chance to win your video course!
Thank you, Kim! Best of luck!
What a wonderful article. Full of creativity and passion for your subject. I would love sn opportunity to win your fabulous course!
Thank you so much for the kind words, Mary! I also wish you good luck in the drawing!
Thanks Bob interesting
Thanks, Dave! This sort of image is not everyone’s cup of tea, but it does convey specific techniques that can be applied across different stylistic approaches.
Great article! It is always interesting to see the process. Thanks for the chance to win your video course.
Thank you so much, Dan – and best of luck in the drawing!
Please enter me in the contest for Bob’s class!
You’re entered. Thanks for stopping by
Inspired! Tried Photogene in my photography, great results.
Thanks!
Very glad that you found Photogene useful, and enjoyed the article. All the best on your creative journey!
Thanks! Great post, step by step is always helpful!
Stimulating and creative, thank you!!….. have a great 2015…