Last year, I came across a new camera app called Reeflex Pro Camera. The app is currently an iOS-only app and I’ve been lucky enough to be a beta tester for the latest version of the app that has just been released.
The Reeflex Pro Camera app aims to deliver pro-grade features in an easy-to-use and easy-to-access mobile phone app. The app offers photographers full manual control over the various settings with RAW and ProRAW capabilities. The newly released version also provides a long exposure and motion blur feature and better low light capabilities.
I’ve been using Reeflex for a few months now and have been impressed with its ease of use and the results it gives. In this guide, I’ll walk you through the main features of the app and how it performed out in the field.

Let’s start by taking a look at Reeflex’s app interface.
The Interface
All too often, camera apps that aim to deliver pro-grade controls to the photographer tend to come with cluttered and confusing interface layouts. This was my initial fear with Reeflex; however, I was pleasantly surprised. The Reeflex developers have managed to deliver an interface that’s simple, well laid out and easy to navigate.
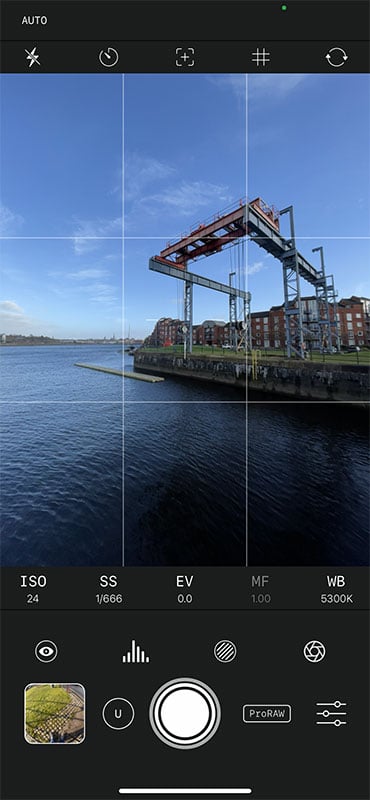
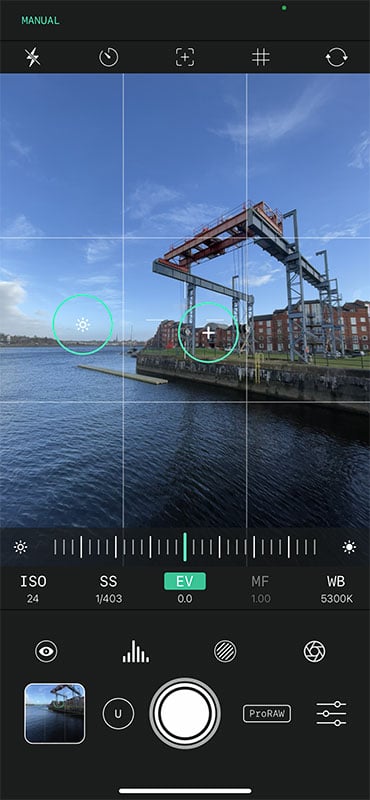
As you’d expect, the bulk of the screen is devoted to the viewfinder. Above this area are 5 small icons that control the flash, self-timer, level-o-meter, composition grid and front/rear camera selection. A secondary menu will appear on selecting the flash, grid, or self-timer, providing some additional options.
Below the viewfinder, you will find all the main manual camera controls: ISO, shutter speed, exposure compensation, manual focus, and white balance control. Tapping any of these will display a horizontal slider dial that allows you to increase or decrease the option setting by sliding your finger to the left or right.
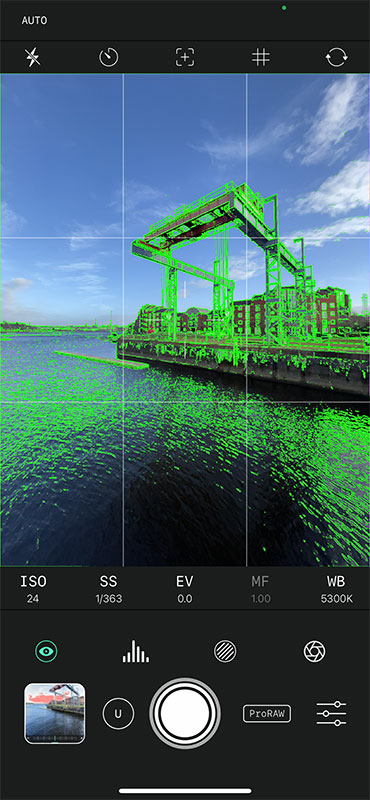
Next, you will find three options that display some visual aids and an option to enable the long-exposure capabilities of the app. Regarding the visual aids, these offer the ability to highlight areas of sharp focus, to display a histogram graph, or areas of exposure peaking. This exposure peaking feature shows zebra strip hatching, highlighting problem areas with overly dark shadows or blown-out highlights.
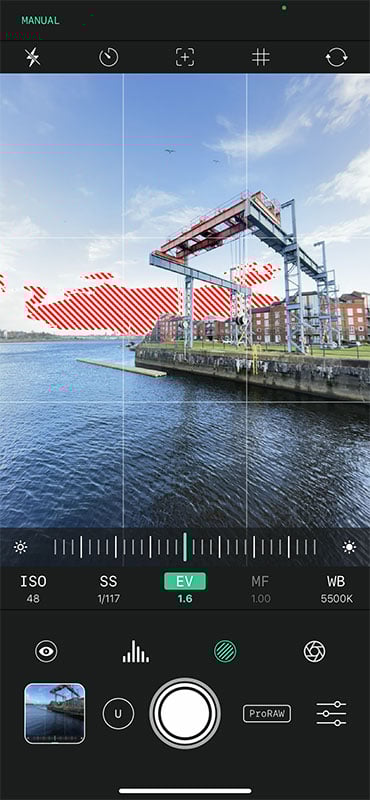
When the focus peaking display is selected, the colored hatching will highlight areas of optimum sharp focus. This is a feature I found very helpful. I’m not sure whether that is due to the nature of focusing on a small smartphone screen or my dodgy eyesight. Either way, I found it to be a helpful and reassuring feature to have as it gave me confidence that my focus was pin sharp.
Finally, at the bottom of the screen, you will find a big, white shutter release button in the center of the screen. The file format selection options can be found to the right – these being ProRaw, Raw and JPEG – and the app settings menu. Unlike other pro-grade camera apps I have used, the settings menu in Reeflex is straightforward. It allows access to changing the file format options or the color of the zebra stripes.
To the shutter release button’s left, you can select the lens you want to use. On my iPhone 12 Pro Max, the options are Wide, Ultra-Wide and Telephoto. Next to this, you’re able to access the camera roll gallery.
Controlling Focus and Exposure
By default, Reeflex will automatically set the focus and exposure for you. In my tests, this seemed to be very responsive. However, as someone who is used to using the iPhone’s native camera app, I would instinctively tap the screen to try and set/lock the focus and exposure. There didn’t seem to be any need to do this as the app did this automatically. I’m told the ability to set a single focus/exposure point is something that will be added in a future update.
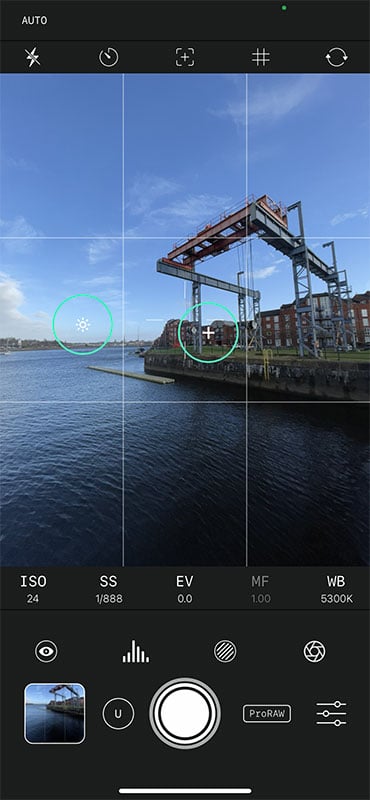
If you need more control over the focus and exposure, all you need to do is tap the screen with two fingers. This then places two reticles on the screen – one for focus, and the other for exposure. If you use apps like Procamera, Camera+, or the Moment camera app then you will be familiar with this type of feature. Moving those reticles around the screen sets the focus/exposure levels for that particular location. A tap and hold of each reticle locks the setting and changes the reticle color to green. To clear these settings, simply double-tap the screen to reset all focus/exposure settings back to normal.
Suppose you want more precise control over the focus and exposure settings. In that case, you will need to turn your attention to the five manual control options below the main viewfinder. As mentioned, by selecting from ISO, shutter speed, exposure compensation, manual focus and white balance control, you can increase or decrease the settings by moving the slider dial.
Using Reeflex, you can manually set the ISO, shutter speed, manual focus and white balance independently without overriding the other settings. However, the EV exposure compensation dial will override everything as this works together with the exposure levels set when tapping the screen.
In my tests, I did find I got the best results in sunny conditions. The lighting and exposure levels were even and colors vibrant. In cloudy, overcast conditions I found I got the best results straight out of camera when shooting in ProRAW or JPEG file formats. RAW tended to require a lot more post-production editing to pull the levels back but then again that’s the beauty of shooting in RAW.
Long Exposure Mode
One of the new features of this latest release of Reeflex is the introduction of long exposure and light trail modes. These modes can be enabled by tapping the shutter icon in the lower right of the screen. Tapping this icon displays a pop-up menu over the viewfinder. The available default options are Off, 0.5s and M.

To enable long exposure, tap the OFF option to switch it to a highlighted ON. This then activates the other two settings. Tapping the ‘M’ option allows you to toggle between ‘M’ for Motion Blur mode, and ‘L’ for Light Trails mode.
If you then tap and drag your finger on the 0.5s duration option, you can adjust the length that the shutter will be open. Options range from 0.5 second to 2 hours or Bulb, which will keep the shutter open indefinitely until you close it yourself.
The light trails mode creates a light trail effect as light or objects move within the viewfinder. This is quite similar to the effects you get from the app Slow Shutter Cam.
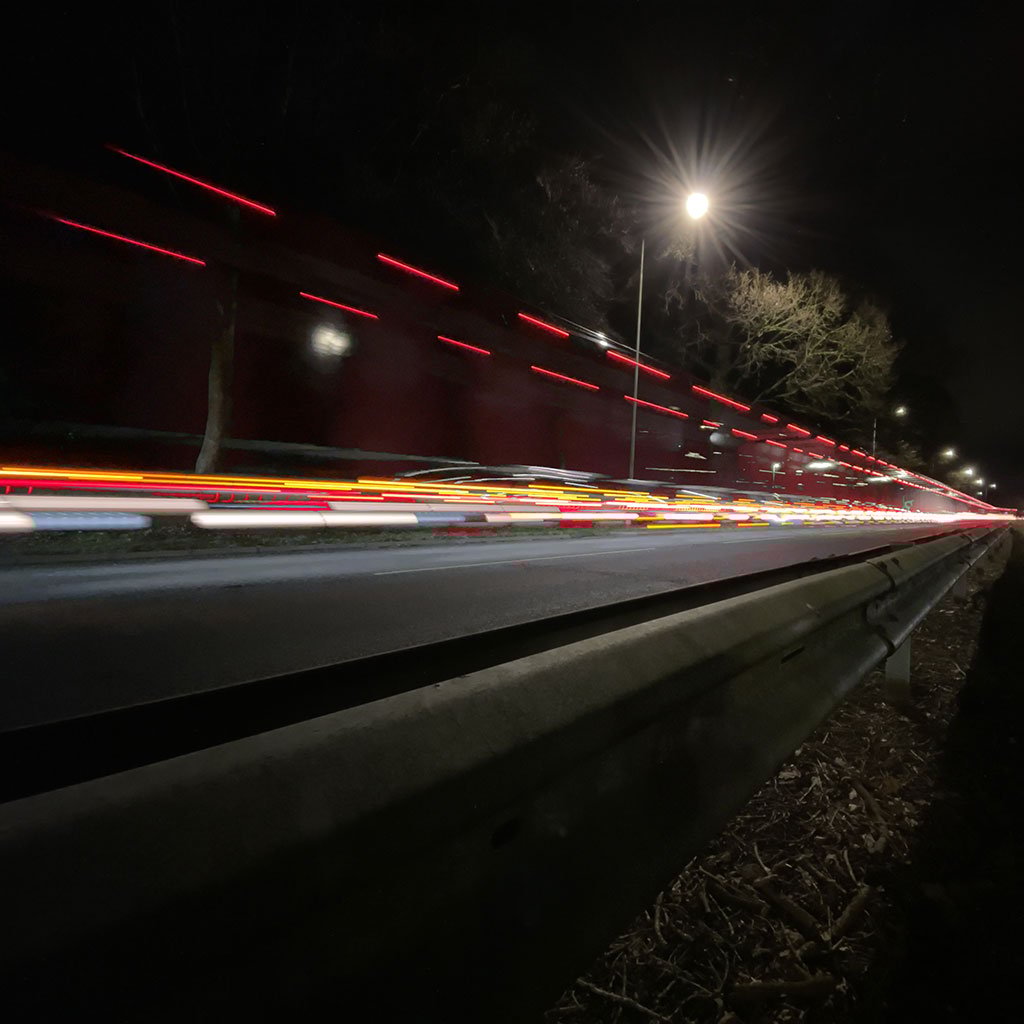
For silky smooth light trails in very dark conditions, it’s advisable to manually reduce the shutter speed in order to avoid a segmented effect to the light trails.
Meanwhile, the motion blur mode smooths out movement in the scene, so elements such as moving water or clouds become silky smooth. I have to say I was very impressed with the results using the motion blur mode. The image below was shot on a very windy day with an exposure time of 20 seconds. As you can see, the water has a glass like quality about it while the clouds add motion and drama to the scene.

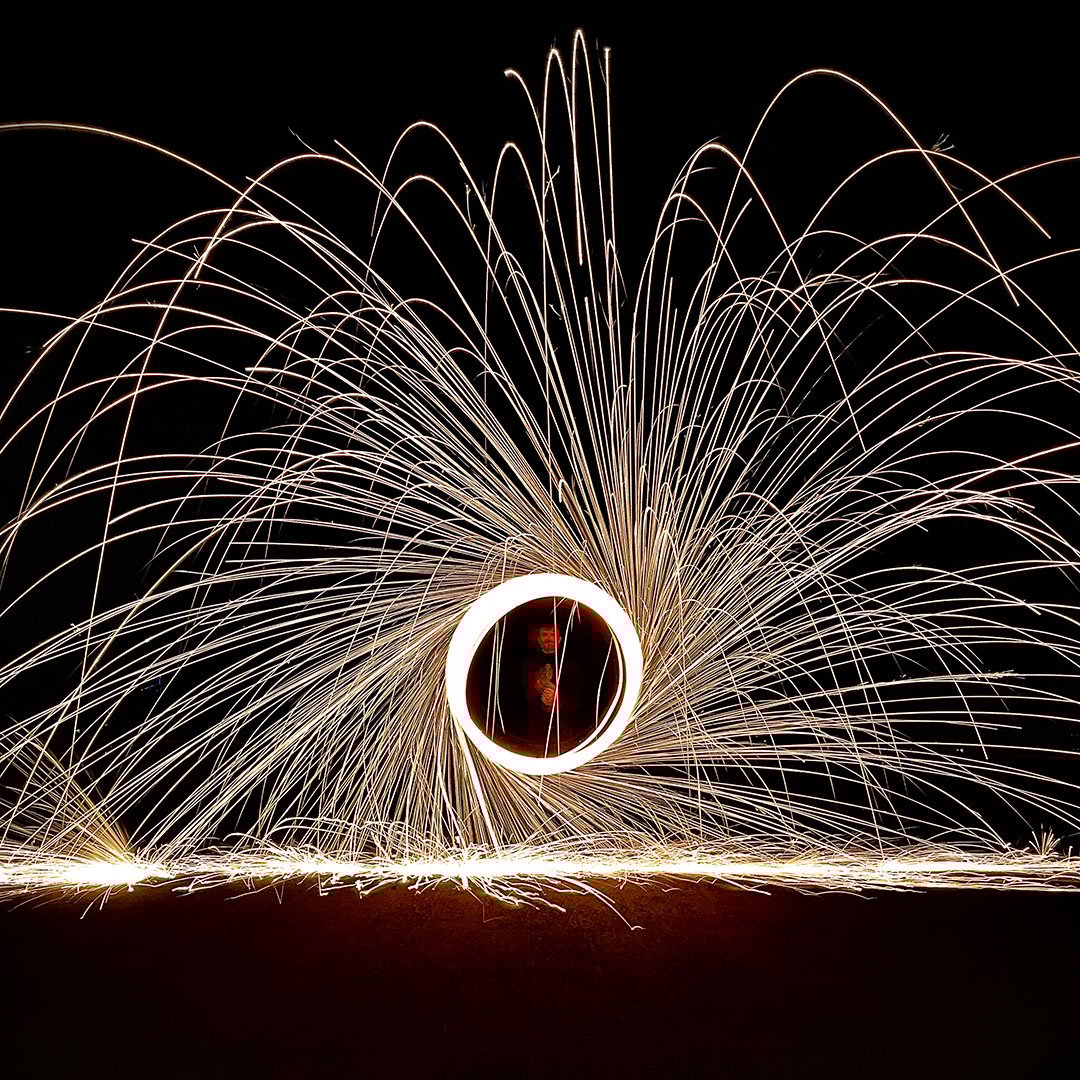
Unlike other slow shutter type apps, I thought the results from the light trails mode in Reeflex were a lot smoother, especially when capturing moving lights at night using a tripod. When using the light trails mode handheld, Reeflex produced some really cool abstract effects that could easily be used as part of a more arty creation during the daylight.
When shooting in low-light situations, I found the app performed quite well. There was a small amount of grain effect in the dark areas but nothing more than you’d expect in a low light situations when using a smartphone.

Final Thoughts
Overall, I like the Reeflex app. I particularly like its layout. I think the developers have done an excellent job of designing the interface. All key controls and features are positioned so they are easily accessible and simple to control with nothing hidden behind complex menus.
The quality of the photos produced by the app is excellent, the colors are bright and true to life. I also found the long-exposure settings produced some good results and I can see plenty of creative opportunities in using these features in the future.
There are a few features I would like to see included in future updates of the app. I think a burst mode feature would be handy, especially for street photography or macro photography. I believe this is a feature that is on the production list for a future update.
It would also be nice to have the option to apply filters, either before capture or afterward, in order to enhance the photos taken with the app. However, a feature such as this would start taking the app into the realms of photo editing and away from its core focus, which is to create a simple, easy-to-use camera app that offers users pro-grade control features.
Add On Lenses
It is also worth mentioning that Reeflex has also just launched a range of add-on lenses to further extend the photographic capability of the iPhone. This range includes; a 60mm telephoto, 18mm wide-angle, 75mm long-range macro, a 10x macro, 210 degree fisheye and 1.33x anamorphic lens. All lenses attach to the iPhone by way of a case with a screw mount.
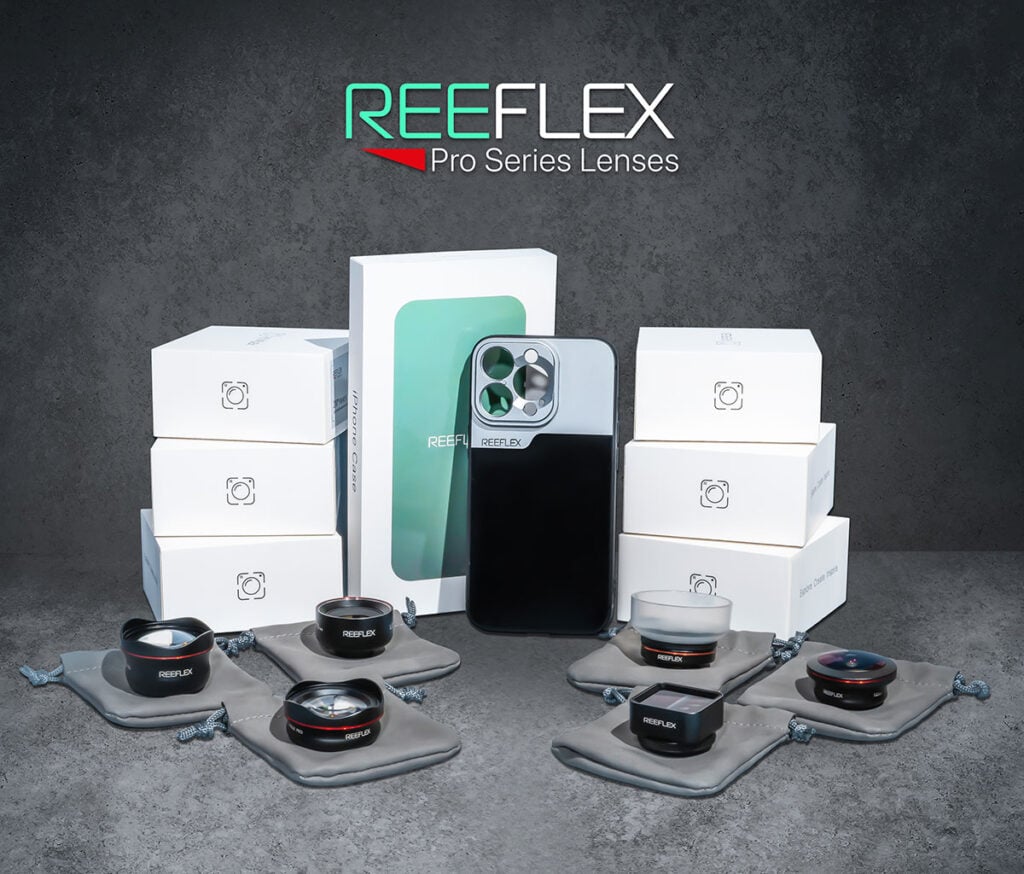
I’m currently in the process of testing out the lenses, so will be able to report on them in due course but my initial impressions are they are well made, and offer good quality results.
Download Reeflex Pro Camera App
Reeflex Pro Camera can be downloaded from the Apple App Store. At the moment, the app is free to download and use, although the slow shutter modes are available with an in-app purchase of $2.99 for a very limited off period, after which time the price will be $5.99.
![]()
Slow Shutter Contest
Reeflex are currently running a contest until 4th March, where users can win a full set of Pro Series Lens and a Metal case (worth 600 USD)
To enter, simply post any sort of long exposure photo taken with the new slow shutter modes in Reeflex Pro (on Instagram or Facebook). Photos must be posted by March 4th. When posting, be sure to add the hashtag #ShotWithReeflex in the description and tag @ReeflexCamera on the photo. Publish the same post or the same photo on your stories, making sure to tag @ReeflexCamera
The winner will chosen in March and there will be additional awards for 2nd and 3rd place.
Join the Reeflex Community
Reeflex also run weekly ‘Photo of the Week’ contests, where users of the app can win discount vouchers for Reeflex products. To enter tag your Reeflex photos with the #ShotWithReeflex tag.


