HDR photgraphy is a popular photographic technique which can be used to improve the photos you take with your iPhone and give more professional looking results. In this article we’ll take a closer look at HDR photography and examine what HDR is, discover when and when not to use it, learn how to use HDR in a common native camera app and introduce other photo apps which excel at HDR. By the end of this article you should be able to go out and expertly take HDR iPhone photos with amazing results.
What is HDR?
HDR stands for High Dynamic Range and is a tool which helps your smartphone’s camera tame the shadows and the highlights in photographic images – often a problem area for even dedicated cameras.
A camera’s ‘dynamic range’ is its ability to capture the darkest and lightest elements of a scene in the same shot. Unfortunately most cameras (even the most expensive ones) can’t capture pure black and pure white and every shade inbetween in the same shot. So when a camera (or a photographer) decides upon an exposure for a particular shot the camera usually has to sacrifice one or both ends of the full spectrum of dark to light. This results in underexposed, overexposed or ‘flat’ images which aren’t very attractive and can appear amateurish.
This is where HDR comes in – it creates images which have a higher dynamic range than normally possible. It’s a clever technical feature available in most modern iPhone camera apps which takes two or more photos instead of just one. The first is automatically underexposed to ensure the detail in the brightest parts of the scene are captured. The second is overexposed to ensure the detail in the darkest part of the scene are captured. Then it automatically blends the two images together, pixel by pixel. As it does this it gives priority to the non-white and non-black pixels in both images – meaning that detail which would otherwise be lost is saved. The more advanced HDR implementations allow you to decide to what extent the HDR effect is applied on a sliding scale.
When should you use HDR?
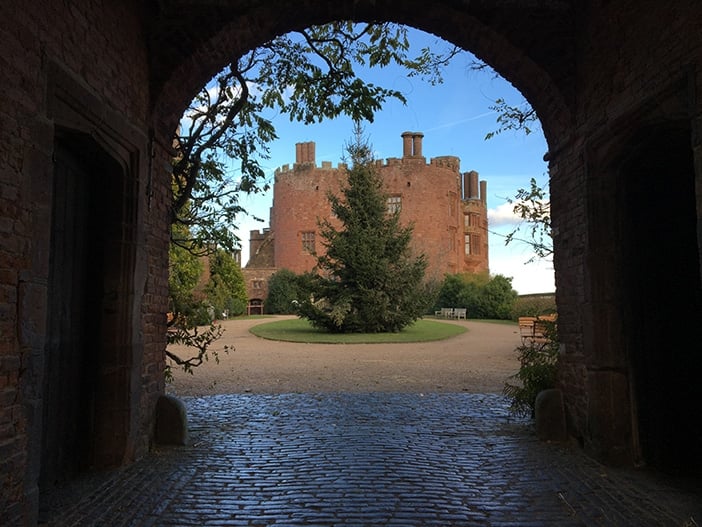
The obvious time to use HDR is when you are faced with a high contrast scene. That’s a scene which has both very dark and very bright elements in it. The most common scenario is where everything above the horizon is light and everything below is dark. Below is a series of identical photos of a castle. The first was taken without HDR and exposed for the building in the distance.
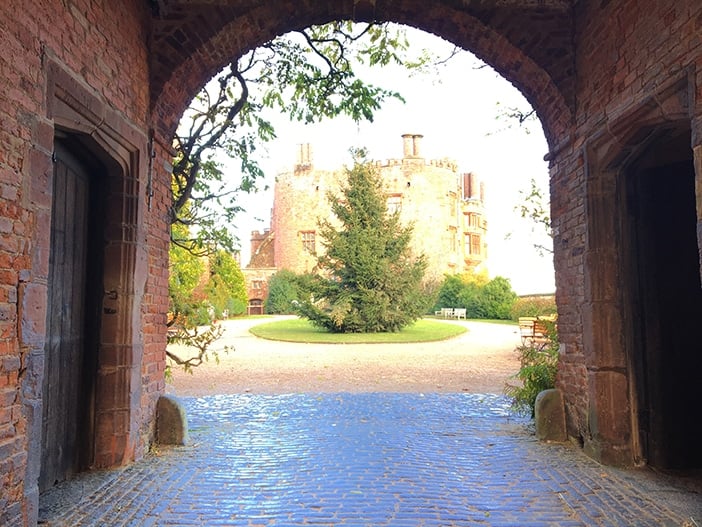
The next shot was exposed for the arch walls on the left and right. Whilst these walls are now nicely exposed the increase in exposure has blown out the building in the distance.
For the next shot we’ve used the native camera app with HDR switched on.
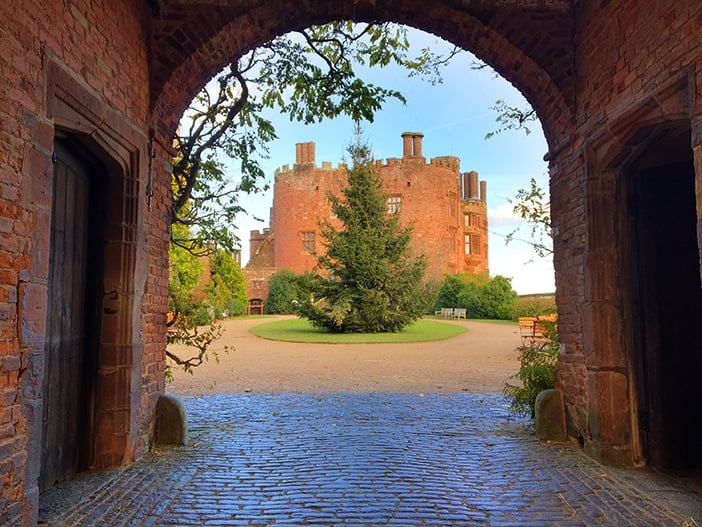
The results are far more appealing without looking artificial. The arch walls and the distant building are all well exposed with a reasonable exposure balance between them.
As with most in-camera and post-processing photographic effects ‘less is more’. It’s a matter of personal taste but my preference is to only use as much of any effect as is necessary, and ideally not so much that it is noticeable. In the next three examples the native camera app’s automatic HDR feature has been fairly conservative – which I like.
The first/left-most photo was taken without HDR. It’s not too bad, my son is nicely exposed, but the sky is blown out with no detail and his dark clothes aren’t revealing much fabric detail either.

The second, right-most image was taken with HDR and while it doesn’t look wildly different from the first you can see more detail in the bright sky and also in the dark clothing. In addition his face and hand are a little brighter. Let’s look at a couple more similar scenarios – both benefiting from subtle HDR enhancement.
The featureless sky in the first shot below is revealed by the use of HDR in the second.
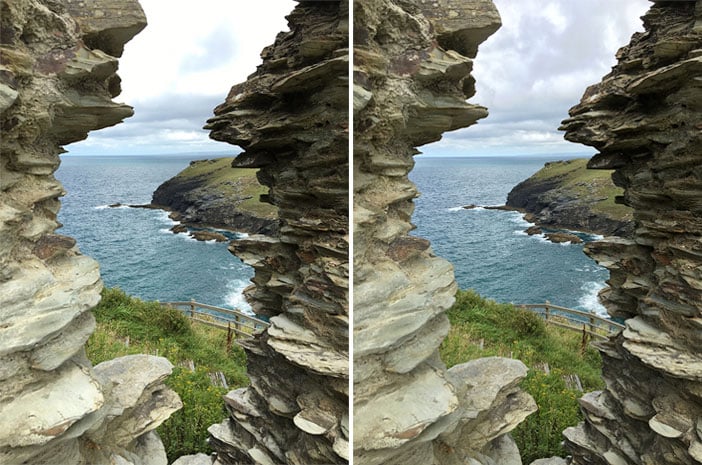
In the example below, if I expose for the sky my foreground is too dark.
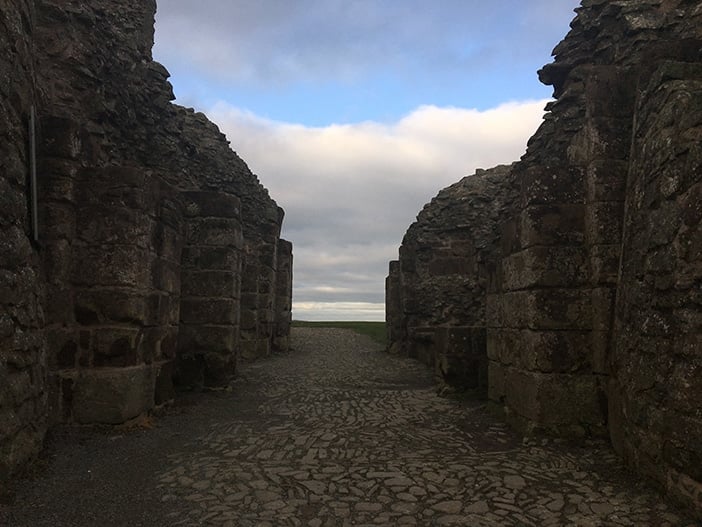
If I expose for the foreground the sky gets blown out.
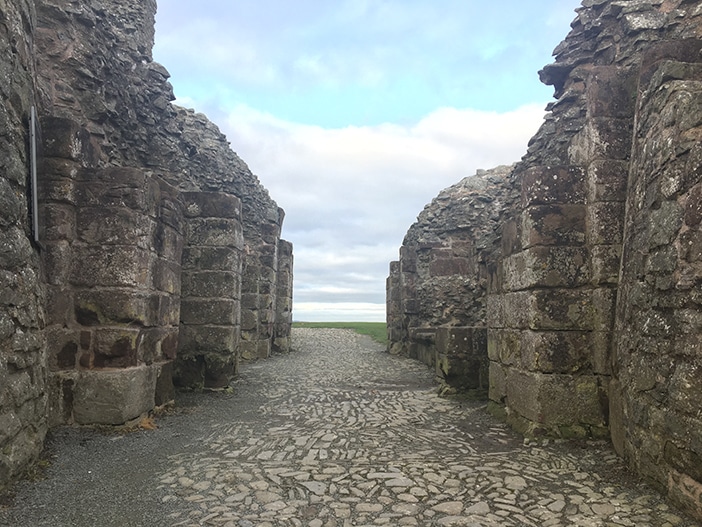
Using a 3rd party HDR app to I get to keep the detail in the sky and the foreground.
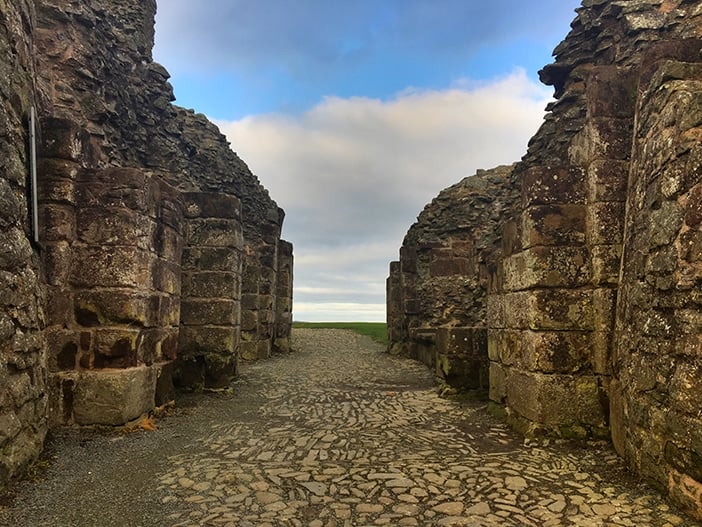
Other examples include scenes with strong sunlight creating hard shadows, snow scenes or group shots where there’s a mixture of light and dark clothing. However, before you resort to using HDR it is important to a) identify the problem you’re trying to solve and b) see whether you can fix it by rearranging your subject(s) or shooting from a different position.
As I mentioned earlier the amount of HDR you apply is a matter of personal taste. It’s perfectly acceptable to use it to create unrealistic, artistic images by applying more of the HDR effect. The results can be otherworldly and dream-like.
When shouldn’t you use HDR?
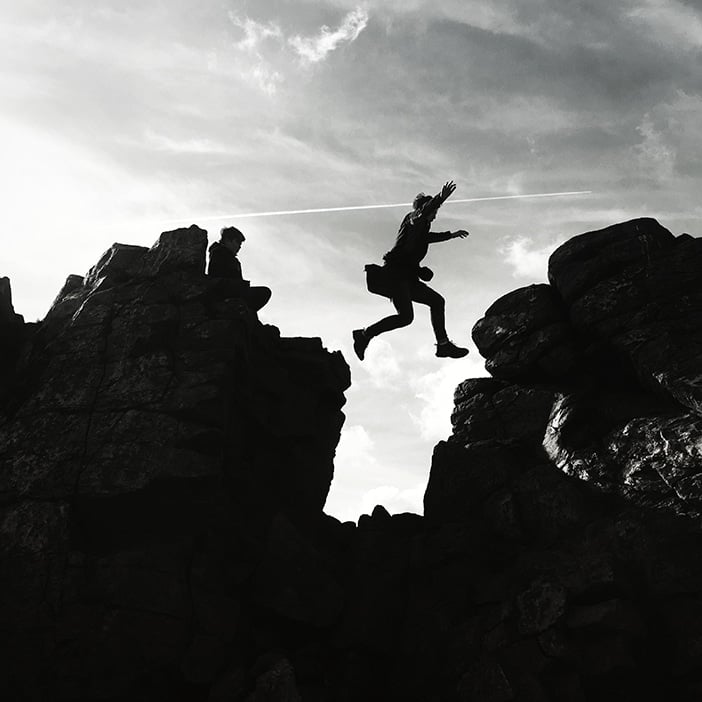
If you are trying to achieve a high-contrast effect you’ll want to leave HDR alone. This is because HDR tries to remove high contrast by brightening the darker areas of a scene and darkening the lighter areas – resulting in lower contrast images. So, avoid HDR if you want your subject silhouetted against a bright background, or if you are wanting high contrast or black-and-white results.
In the image below, if HDR had been used, the sky would have been darker, the person jumping would have been lighter with some detail revealed, resulting in the loss of contrast and probably ruining the drama of the shot.
As good as HDR is – you may be using it to solve a problem that could better be solved another way. For example, if you’re shooting a headshot into the sun or against a bright sky you’re likely to end up with a dark subject or a burnt out sky. Before you reach for the HDR setting try switching on the flash. This will fill in the dark foreground without burning out the sky.
Because the HDR feature requires multiple shots to be taken there will be an inherent delay between these shots. Even though this delay is tiny if your subject moves sufficiently between shots then you could get strange results. The faster your subject is moving in relation to the camera the more noticeable the problem. Therefore, you’ll probably want to avoid HDR for high-speed action photography – e.g. fast paced sports etc. The image below shows what can happen if you shoot a fast moving subject with HDR.
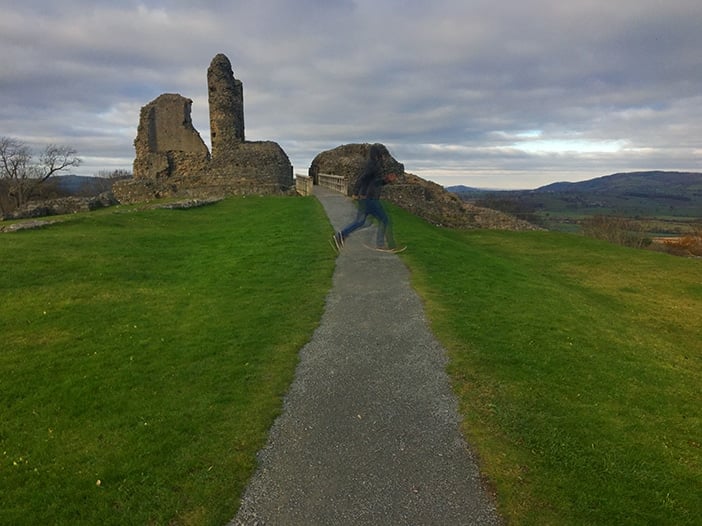
The running person was in one position when the first shot was taken by the HDR tool, and in another when the second shot was taken. The two shots were blended automatically to give the HDR effect but we see an undesirable blurring or double-exposure effect.
How to use HDR in the iOS (iPhone and iPad) native camera app
The native camera app on iOS devices has an excellent, simple HDR feature. To activate it simply tap the ‘HDR’ option at the top of the app window – then select Auto, On or Off. Choosing the ‘Auto’ setting tells the app to decide for itself when it should use HDR. The ‘On’ setting forces the app to use HDR every time, and the ‘Off’ setting tells the app not to use HDR.
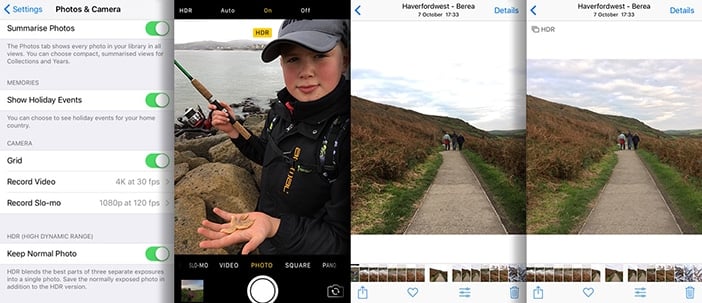
You can decide whether the camera app saves the non HDR version as well as the HDR photo. This setting is buried in the iOS device’s ‘Settings > Photos & Camera’ page. This will fill your device’s memory up more quickly but it does give you the flexibility of using the non-HDR version. This is recommended because you can’t easily remove the HDR effect from a photo afterwards. If memory/space is a big concern you can always remove the version you don’t want to keep once you’ve checked both versions out. You can identify the HDR version of the photo by the presence of the word ‘HDR’ at the top-left of the HDR image in the ‘Photos’ app.
The best things about the iOS implementation of HDR are its simplicity and its subtlety. You don’t actually have any control over the level of HDR applied – but this is fine in most cases because it does a great job and lets you get on with taking more photos rather than tweaking settings. The effect applied is subtle enough that the average person wouldn’t notice anything special had been done to the photo – but when you compare the HDR image to the non-HDR version the improvement is usually obvious.
Examples of other apps which excel at HDR
For the most part the native camera apps will do a great job of applying HDR when shooting your subjects but if you want greater control over the strength of the HDR effect you may need to look at one of the many 3rd party apps for your device. Below we’ll look at a handful of popular ones and help you identify the right one for you.
Pro HDR X
For iOS devices this popular HDR camera app improves on an earlier ‘Pro HDR’ version we reviewed. It offers a good combination of ‘out of the box’ simplicity with the option of advanced controls – the main one being the ability to dial in the correct amount of HDR after taking the shot.

The most impressive advanced control is the ability to position 3 boxes to identify areas of the scene which must be exposed correctly. You would want to ensure you use the 3 boxes wisely – choosing a dark area of the scene, a light area and perhaps another important area – possibly the subject.
Additional features include a ‘rule-of-thirds’ grid overlay, a 2 or 10 second timer, the ability to import up to 3 exposures from your camera roll which the HDR is applied to, a zoom feature and flash control (including using the torch), color, brightness, hue, contrast and exposure controls.
Download: iOS
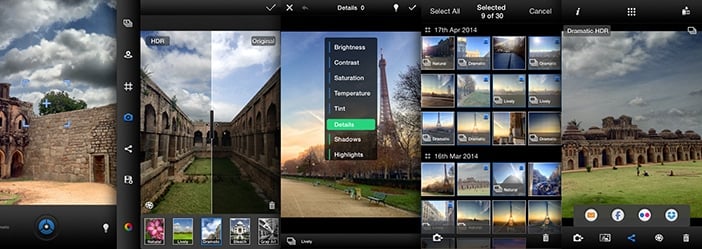
Vivid HDR
This iOS HDR app has a long list of great reviews and seems to be among the more professional tools on the market. It offers many great quality presets but also provides the fine control some of us crave in our apps. It also claims to do away with the ‘halo’ problem we touched on earlier and minimizes the unwanted side-effects caused by moving the camera during capturing multiple frames.
Simply HDR
Available for both iOS and Android devices Simply HDR is a little clunky when compared to Pro HDR X and Vivid HDR but it will appeal to those looking for more arty, extreme results. The HDR effect can be set automatically or dialed-in.
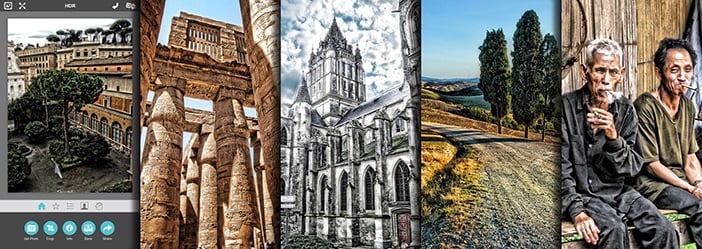
An attractive feature they’ve included is the ability to save your chosen HDR shooting settings as a preset which can easily be recalled and used later.
Summary
Hopefully this article has introduced you to HDR, shown the opportunities it offers for improving image exposure and given you a small selection of excellent apps you can use to take your HDR iPhone photos further.
To recap:
- HDR is an in-built camera function which increases the dynamic range of the resulting image by blending an underexposed and an overexposed image of the same scene, giving a better exposure which retains detail in the lowlights/shadows and the highlights.
- Recognize when to use it – i.e. when you have very dark and very bright regions in the scene but you wish to retain the detail in each.
- Know when not to use it – i.e. when you wish to maintain high contrast, shot low or high key images or work in black & white.
- Use it in moderation – don’t overdo the strength of the HDR effect to the point it becomes cheesy – unless that’s the result you want!
- Remember to use a tripod (or at least hold the camera very still) because any movement between the underexposed and overexposed shots the HDR feature automatically takes may result in blurring.
- Remember that HDR is trying to solve a problem. Check that you can’t solve that problem better by rearranging your subject, scene or your shooting position so that the scene no longer contains both very dark and very bright areas – e.g. for an outdoor group shot move everyone under the shade of a tree.



Lightroom Mobile does a pretty good job of implementing hdr as well you can shoot as a dng file for more flexibility when processing in LR Mobile.