Focus is one of the key fundamentals of good photography but there’s more to it than just the sharpness of the image. By paying close attention to what is in and out of focus you can achieve so much more. Clever use of focus can draw the viewers eye into a scene and toward the subject, it can make it stand out or blend it into the background, it can also help to create or convey an emotional connection.
Understanding Depth of Field
Depth of field is the distance within a photograph that appears sharp, while the areas in front of and beyond this point begin to appear blurry. In traditional DSLR photography you can easily control your depth of field through the adjustment of the aperture. A large aperture of say f/4 will result in a narrow depth of field while a small aperture setting will result in a deeper field of focus. Having this degree of control enables the photographer to create better, more interesting images.
However, smartphones and DSLR cameras work differently. To start with, as smartphones don’t have an aperture dial they don’t offer the same level of flexibility and control that DSLR cameras do. Also due to the tiny sensor inside the smartphone they generally have a large depth of field. But do not worry, if you want to gain more control over the focus and depth of field that your smartphone provides then all is not lost.
Controlling Camera Focus
Let’s start with focus in at its simplest form. There’s no big secret about this and it’s not rocket science. The native camera app of a smartphone will automatically focus and expose for you. You don’t need to do anything but if your intended subject happens to be positioned off centre or in the foreground then you will want to regain a little more control over the photograph. On an iPhone this can be done by tapping the screen at the point where you want to set your focus. The camera will readjust its focus to this point.
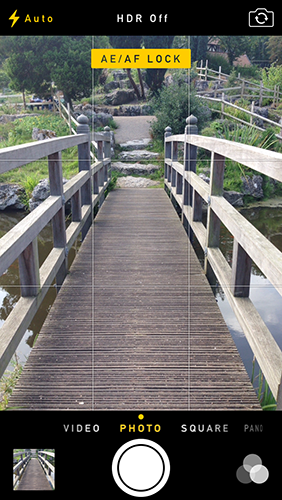
However, there is a problem with this approach as it also sets the exposure for the photograph as well. Should the foreground be darker than the background then setting the focus and exposure for the subject will overexpose the background resulting in the loss of detail in it. To get around this problem the focus and exposure needs to be locked. To do this on an iPhone, tap and hold the screen for a few seconds until the yellow box flashes and the AE/AF Lock message is displayed. You are then free to compose your shot. This is similar to half pressing the shutter release button of a DSLR camera in order to lock your focus and exposure. However there maybe situations where the focus and exposure points are in different areas of the scene.
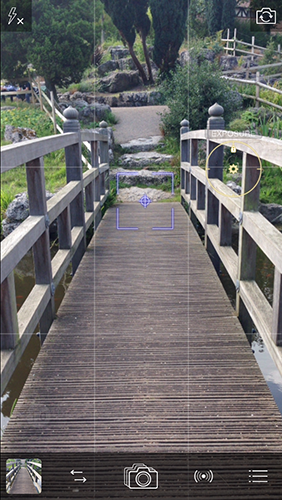
The iPhone also allows you to lock the focus and then adjust the exposure to suit. Before the iPhone 6 this was not possible. There are also other camera replacement apps such as Procamera (iOS), Camera+ (iOS) and Camera Awesome (Android) that also allow you to separate out the focus from the exposure. With these apps you can simply drag out the focus/exposure points to separate them and then move the points around the screen to the desired locations. This means you have the ability to focus on a foreground subject but expose for the background detail.
Controlling Depth of Field
As mentioned before, depth of field is the distance within a photograph that appears sharp, while the areas in front of and beyond this point begin to appear blurry. While this is easy to control in traditional photography it isn’t so in iPhone photography but thanks to apps such as Big Lens and Afterfocus we can take back control of this situation.
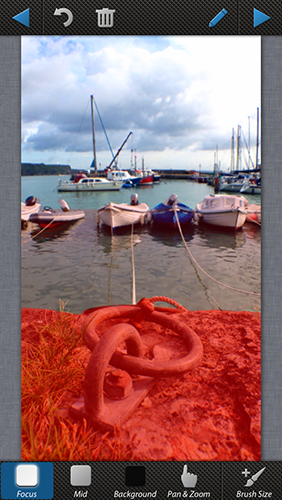
Big Lens (iOS) and Afterfocus (iOS/Android) offer the ability to create a mask over the areas of a photograph that you want to remain sharp and in focus. You can then apply various types of blurs and filters to the other areas to simulate the out of focus, depth of field effect. Of these two apps Afterfocus probably has the edge as you can create three types of masks for the fore, mid and backgrounds thus creating a slightly more natural and subtle blurring.
Snapseed (iOS/Android) is another app that will allow you to control the areas of focus by using the Lens Blur module. Although Lens Blur in Snapseed does a good but basic job if you are looking for a more refined and professional finish then I recommend Afterfocus.

Afterfocus
Big Lens

Snapseed
How to Create Depth of Field Using Afterfocus
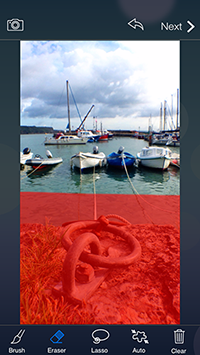
The process of creating a depth of field effect in Afterfocus is simple. Once you have selected the photo you want to work with, the first step is to create a mask for the area that will remain in focus.
Create the mask
This is done by using your finger to paint a mask onto the image. There are three types of mask, the focus area which is the bit that will remain in focus, the mid-ground, which will be mildly out of focus and the background which will be much more out of focus. This layering of focus area helps to build up a more natural looking blur effect.
Adjust the settings
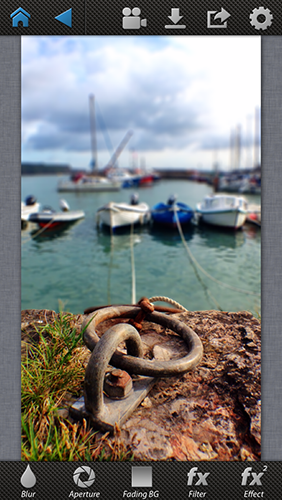
The next step is to adjust the settings of the photograph blur to meet your desired look. The options available to you include:
Blur – This controls the strength of the blur. Within this setting you can also choose the style of blur. The two options open to you are lens blur or motion blur.
Aperture – This controls the shape of the blurring especially if you are using the Bokeh setting.
Fading Background – This setting applies a graduated mask to the photo. In manual mode this can be dragged up or down to control where the foreground and background focus/blur appears.
Filter – This setting provides a selection of filter effects that can be applied to your photo.
Effect – This setting offers further options to customise your image.
Save and Share
Once your image is complete, Afterfocus enables you to save or share the photo across several social networks including Facebook, Twitter, Flickr and Instagram.
Mastering the creative use of focus and depth of field within your photography will bring a new level of control to the images that you capture. So next time you are composing a photo pay attention to the areas of the image that are in focus and those that maybe out of focus. Also give some thought to how depth of field could be applied to the photo to enhance the scene and give greater attention to your subject.
Don’t forget about your exposure points though. If your exposure and focus points are in different locations then consider using apps like Procamera or Camera+ to regain more control of the image.
Finally, explore how post production apps such as Afterfocus, Big Lens or Snapseed might help you create a greater depth of field effect but a word of warning though. Don’t overdo the blur effect unless of course you are looking to create a surreal look. You only need to apply a little blur to an image in order to create an effective and natural looking result. If you go too far then the result will look artificial and over processed.


